Add Horizontal Menu Bar in Blogger

Making Your Blog Simple and navigative grow the love of readers and visitors.Actually the Horizontal Menu Bar is an awesome bar which can be placed at the top of Blog or below header Section,which will certainly helps the readers to easily navigate,contact,and explore your blog contents.In this regards,here is a cool Horizontal menu bar (Black Style) which can make your blog navigative and friendly.

How To Add Horizontal Menu Bar in Blogger

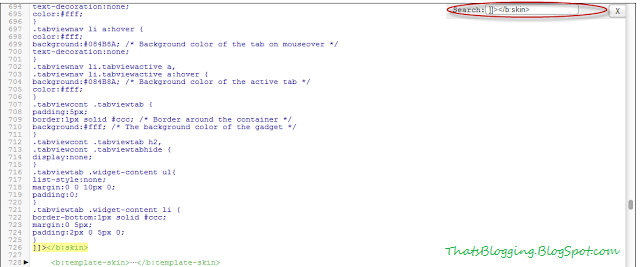
  • Now Search for ]]></b:skin>
  • Copy and paste the below script above ]]></b:skin>

#Wrapper_Nav{background:#111; height:35px;}
.Top_Menu{margin:0 auto; width:960px}
.Menu a{color:#fff; display:block; padding:4px 7px;text-decoration:none}
.Menu a:hover{background:#f4f4f4; color:#333; display:block}
.Menu ul{list-style:none; margin:5px 0}
.Menu li{float:left; height:25px}
.Menu{float:left; height:35px; width:960px}

  • Now Search for <body>
  • Now Copy The Below Script and add it below <body> tag

<div id="Wrapper_Nav">
<div class="Top_Menu">
<nav class="Menu">
<ul>
<li><a href="#">Home Tab</a></li>
<li><a href="#" rel="author">About You Text</a></li>
<li><a href="#">Contact Text</a></li>
<li><a href="#">Forum Site</a></li>
<li><a href="#">Advertise Money</a></li>
<li><a href="#">Guest Post</a></li>
<li><a href="#">Text</a></li>
<li><a href="#">Privacy Policy Of Your Blog</a></li>
<li><a href="#">Disclaimer Text</a></li>
</ul>
</nav>
</div>
</div>

  • Replace # with the specific links you want to redirect,also change the text to your desired text.
  • Note :- If you are interested in adding more menus,simply add "<li><a href="#">Text</a></li> b/w <ul> and </ul>
  • Save Your Template
  • That's it !
So What's Up:- Actually this menu bar will make your Blog navigative to the readers,they can explore your blog contents easily by clicking the labels,Share your ideas with us,stay Blessed,Happy Blogging !


Top 10 Professional Free Premium Blogger Templates

Blogging is now-a-days a great way to share your knowledge with the world.Blogging Platform Provide an easy way to publish your contents worldwide.So Do You want to Create a Blog?If Yes,Then You Can but whenever a new blogger creates a blog,he/she just chose the blogger default template which is looking boring in real.A flood of Templates are coming to the blogging world,these Blogger Templates are made by different Authors.These Blogger Templates are Professional Blogger Templates,by using these professional blogger templates you will never see your visitors bore.These templates have alot of features such as High loading speed,cool look,responsive,magazine style,3 columns,2 columns along with different widgets and drop-down menus.For this purpose we have collect Top 10 Professional Blogger Templates,hope you will found these interesting. 


How To Download and install These Blogger Templates?

If You want to download any of the below blogger template,we have provided the Download Link along-with Live Demo.So For Downloading just click the Download Link and Download the Template.Now if you are new blogger and you don,t know how to install or how to backup your blog template i will suggest you to read this article (Installation Complete Guide).

Top 10 Professional Free Premium Blogger Templates 2013

We have a Top 5 List,Hope You will love it,So have a look and pass your comments,if you have any question must share with us,stay Blessed :)


BResponsive Blogger Template


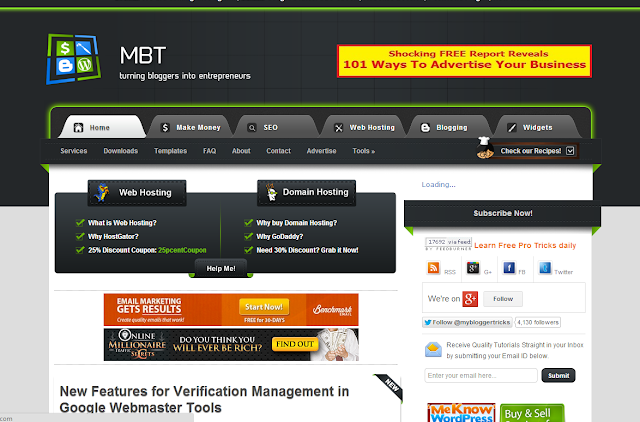
MBT(My Blogger Tricks) Blogger Template V 2.0 

MBT Blogger template V 2.0 is a professional template Designed by Muhammad Mustafa (MBT Owner).This Template is a fantastic template for Blogging,and tech blogs.This template has 3 columns layout along with beautiful drop down menu.This Template is SEO Optimized template.MBT Blogger template V 2.0 is ads ready template.It has Automatic Read-more option,author box and social share widgets.This template works with all type of browsers such as Google Chrome,Mozilla and Internet Explorer etc.MBT Blogger template is a responsive Template with beautiful black color background which makes it more awesome template.
Template By MBT
mbt-blogger-template-v-2


Johny Darkfire Blogger Template

johny dark

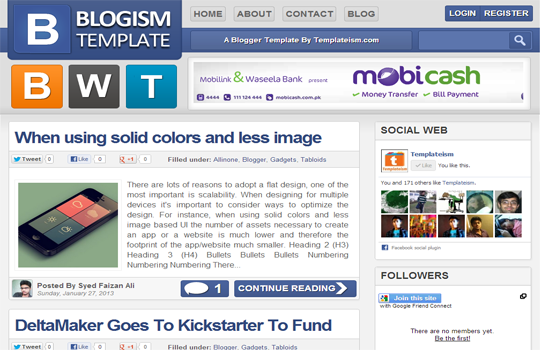
Blogism Blogger Template 2013

Blogism Blogger Template is design by a young Blogger Syed Faizan Ali (MBL Owner) from Pakistan,This Template is specially designed for Tech Bloggers .Blogism is ads ready template,it has One right sidebar and beautiful share buttons below the posts. Blogism Blogger Template has awesome header which makes it more beautiful Template.It has 2 columns layout.Blogism template has read-more option,it has author avatar with each post.This Template works with all type of Browsers such as Google Chrome,Mozilla Firefox and Internet Explorer etc.
Template By Templatism
Blogism Blogger Template Large Layout


Big News Blogger Theme V2


Lord HTML Blogger Template

Lord HTML Blogger Template is a new free Blogger Template design by Durai Sankar,its author is LORDHTML. Actually Lord HTML Blogger template is a clean and responsive Blogger template,it is also for Blogging and Tech blogs.However you can use it for any type of Blog.This template is ads,and SEO Optimized Template.It has no Footer,however it has one beautiful right sidebar along-with drop down menu which makes it attractive template.Moreover it has a search bar,page navigation widgets,social buttons,readmore option,and HTML Code View.This template works with all type of Browsers such as Google Chrome etc.You can Download it free from our Blog.
Template design by Durai Sankar

Labnol Blogger Template

Labnol Blogger Template is a Professional Blogger Template design by Labnol.Org.This template is designed by the Pro Blogger Of India,this template has many features such as Simple and Clean design,it has One right sidebar,This template is Purely SEO Optimized.The Loading Speed of this template is very fast.Labnol Blogger Template has white background which makes it more attractive template.However it works with all type of browsers such as Internet Explorer etc.You Can easily Download this template from Our Blog.
Template design by Labnol
labnol blogger template

Sensational Blogger Template


Spice Up Your Blog Template

The last and most beautiful Blogger Template is Spice up Blogger Template which is designed by Durai Sankar.This Template is ads Ready template,it has awesome ads options.This template has 3 columns layout.It has ready Brown Color Drop Down menu.This template has Subscription widget and Own Fonts.This template has One Right Sidebar along with beautiful header which increase its beauty.This Template has ready Social Buttons which will surely help you to get more Facebook Page Likes,Twitter Tweets etc.However this template works with all type of browsers.You Can Download it free from Our Blog.
Designed by Durai Sankar.
Spice-up-your-blog-Blogger-Template


Metro BTK V2 – Impressive Blogger Template

metro BTK

What's Up:-  These were some Professional Templates,which are really very fantastic,you can use it for any type of Blog,This templates are SEO Ready templates along with many features.Share your ideas with us,Stay Blessed Happy Blogging !

Simple Super SEO Blogger Template

Simple Super SEO Blogger Template is 2 Columns free Blogger Template.Simple Super SEO Blogger Template is ads ready Template.This template has One Beautiful right sidebar which makes it an exclusive template.This template is SEO Ready i.e you don't have to waste your worthy time on SEO of template because its providing you Built-in.This Template has white Color Background along with Top Navigation Menu,This template works with all type of Browsers i.e Google Chrome,Mozilla,Safari,IE 8+ etc.You Can Get it free from our Blog.

Features Of Simple Super SEO Blogger Template

  • Fixed Width
  • SEO Ready
  • Ads Ready
  • Top Navigation Menu
  • White
  • One Right Sidebar
  • Works with all Browsers
  • Popular Posts Widget
  • Bread Crumbs
  • Simple and Professional Look
  • Magazine
  • Exclusive Design

How To Install Simple Super SEO Blogger Template

  • Click On The Blue button Below
  • It will redirect You to a new Page
  • All The Steps are clearly Mentioned
  • Follow That Steps Carefully and install Your Blog Template easily and Carefully 
  • Stay Blessed,Happy Blogging!
Installation 
Simple Super SEO Blogger Template
Last Reviewed by Iftikhar uddinon June 24 2013
Rating: 5

Add Social Sharing icons To Blogger Header

Its old but Old is Gold,Adding Social Media icons in the Top Right Corner of the Blog will help you to improve your Blog Social Status.These icons will activate when someone hover over them,these icons include Facebook,Twitter,and Google+ Share Buttons along with blog feeds option. Actually I got the idea of this article from the below Question.
sharing-buttons

Question:-I don't Like Social Sharing icons in the sidebar,i want to put add these social media icons in Blogger Header,How i will put that?

How To Add Social Sharing icons To Blogger Header


  • Now We have to expand the style,For Expanding the style Find <b:skin>...</b:skin> in the template coding and immediately click the small arrow left to <b:skin>...</b:skin> 
  • After expanding the style search for this tag ]]></b:skin>
  • Now Copy and Paste the below Code just above ]]></b:skin> tag
  /* Social icons By ThatsBlogging.Blogspot.Com
----------------------------------------------- */
#social-icons {
margin-bottom:10px;
height:50px;
width:100%;
display:block;
clear:both;
}
.social-media-icons {
display:table
}
.social-media-icons ul {
text-align:right;
padding:5px 5px 0 0
list-style-image:none;
list-style-position:outside;
list-style-type:none;
}
.social-media-icons ul {
margin-bottom:0;
padding:0;
float:right;
}
.social-media-icons li.media_icon {
margin-left:6px;
padding-left:0 !important;
background:none !important;
display:inline;
float:left;
}
.social-media-icons li:hover {
-moz-transform: rotate(360deg);
-webkit-transform: rotate(360deg);
-o-transform: rotate(360deg);
transform: rotate(-360deg);
-moz-transition: all 0.5s ease-in-out;
-webkit-transition: all 0.5s ease-in-out;
-o-transition: all 0.5s ease-in-out;
-ms-transition: all 0.5s ease-in-out;
transition: all 0.5s ease-in-out;
}

  • And Now Search for the below Line in the Template Coding
<b:section class='header' id='header' maxwidgets='1' showaddelement='no'>  

  •  Now Copy the below Script and add it above this Line <b:section class='header' id='header' maxwidgets='1' showaddelement='no'>  
  • Code is below
 <div class='social-media-icons' id='social-icons'>
<ul>
<li class='media_icon'><a href='http://facebook.com/RoseNbushes'><img border='0' src='https://blogger.googleusercontent.com/img/b/R29vZ2xl/AVvXsEhHeFHZ-d9yCYQxlxiJhaiQkK1igIaekKkHDCqwfv6rlv357B3P4q2cfYjxwPYNiKxOBChilcGn7Mn4diaMfcwONU2i69CoOTZAydo_vd8C9_xLImcm6QgBY2CiEkybIrpya3yqCc1kyM4/s1600/Facebook.png'/></a></li>
<li class='media_icon'><a href='http://twitter.com/#!/thatsblogging'><img border='0' src='https://blogger.googleusercontent.com/img/b/R29vZ2xl/AVvXsEjEwp5CwXMjCMUl1hzLu9tpvUyljD41WsLqEsuPfMqJnvwprb2pPDNsIZeoA2togAMqR_axsttOqR29wTBMpkOhlRI82XMg3IQkoiXKtHxT653GvQX857baBQnhgXIT79g6F_5V5Bu19Dc/s1600/Twitter.png'/></a></li>
<li class='media_icon'><a href='https://plus.google.com/g+idgoeshere/about'><img border='0' src='https://blogger.googleusercontent.com/img/b/R29vZ2xl/AVvXsEg2GpJd-GYSAuL7QlOC33E_rL9mfynxoPuTeS1DaXD0ycXnUNUfzPun_IS5rc3X_p9qREeeGp83CIxoTr7dWNzwfqzPdfAIN_PS75YsSdWahjORL3a1O2IlpEuci62R8VvOWPoTa3ZC8mg/s1600/googleplus.png'/></a></li>
<li class='media_icon'><a href='http://BlogName/feeds/posts/default'><img border='0' src='https://blogger.googleusercontent.com/img/b/R29vZ2xl/AVvXsEhvWpNky9Qyud1dHX2t3x4ltYcZzFGhr-i_gNUlLMl55P3wfhxfaAr2snczkxpcxo_z2mmI3e9UZ9jVtYQ8GDRDiqBT_jC1Y7X077uO6Ewm2kr7s3nf-xaHOwyRiAKy738MUoKaLjxojv8/s1600/RSS.png'/></a></li>
</ul></div>

Changes in Coding

  • Replace "rosenbushes" with your Facebook Username 
  • Replace "ThatsBlogging" with your Twitter Username 
  • Replace "G+idgoeshere" with your Google+ ID
  • Replace "BlogName" with your Blog Link 
  • And Replace all the Green Links with the icons url if you want to add new. 
  • Finally hit Save the Template and enjoy Social Sharing Icons On Your Blog Header.
So What's Up:- Share your Beautiful ideas with us about these icons,ask any question,Stay Blessed Happy Blogging.

How To Add 5 Star Rating Widget To Blogger


Getting positive feedback from visitors and blog readers enable you to get fame.The Stronger your feedback is the more your blog visitors will be happy.5 Start Rating Widget is an awesome source of getting feedback and Positive response from your readers,this widget show 5 stars at the top or below the blog post,where one can rate your blog article.This Widget also show the total number of views of the article along with the number of votes.You can rate an article by Selecting and Clicking the 5 stars at Once.Actually this Blog has no effect on Blog Loading Speed.

How To Add 5 Star Rating Widget To Blogger


  • First of all Go To Blogger Dashboard
  • Then Click On Template >> Edit HTML
  • Now search for </head> tag
  • After Finding the Head Tag Copy the below Script and paste it just above it or before it.

<link type="text/css" rel="stylesheet" href="http://static.graddit.com/css/graddit.css" />

  • After Implementing the above steps search for this Code <data:post.body/> 
  • Now Copy the Below Code and paste it just above/below <data:post.body/>


<b:if cond='data:blog.pageType != &quot;static_page&quot;'><div expr:id='"labels_" + data:post.id' style='display: none; visibility: hidden;'><b:if cond='data:post.labels'><b:loop values='data:post.labels' var='label'><data:label.name/>,</b:loop></b:if></div>Rate this posting: <div expr:id='data:post.id' class='ffbs_rate'>{[[&#39;&lt;img src=&quot;http://static.graddit.com/img/star.png&quot;/&gt;&#39;]]}</div><div expr:id='&quot;ffbs_stats_&quot; + data:post.id' class='ffbs_stats'></div><script type='text/javascript' expr:src='&quot;http://www.graddit.com/rate/eng/5/&quot; + data:post.id + &quot;?id=&quot; + data:post.id + &quot;&amp;stats=ffbs_stats_&quot; + data:post.id + &quot;&amp;labels=labels_&quot; + data:post.id + &quot;&amp;info=info-&quot; + data:post.id + &quot;&amp;info_delay=2&amp;url=&quot; + data:post.url + &quot;&amp;class_star=ffbs_star_img&amp;class_star_set=ffbs_star_img_set&amp;class_star_vote=ffbs_star_img_vote&amp;views=yes&amp;votes=yes&amp;average=yes&quot;'></script></b:if>

  • Hit Save Template and that's it 

Important to Note

This Widget Provide two option i.e you want to show it before Blog Post or below Blog Post,Actually i will prefer the below section because when readers read your article at the end they decide how was the article.So for adding it Below the Blog Posts Copy the Above Script and paste it below <data:post.body/>,and if you are interested in showing it above the Blog post so do the above steps and paste the copied script above <data:post.body/>.
-If you are using Magazine Style Blogger Template or Responsive Blogger Template,then you have to Copy the above Script and paste it below/above <data:post.body/> as many times as it is in the Template HTML.

So What's Up:- This Widget can impress your blog readers but if you have a good feedback,however it doesn't slow down the blog loading speed,Stay Blessed,Happy Blogging.

Add Go/Scroll To Top Button To Blogger

Professional Blogs have a flood of Comments,reading these comments one can slip into the bottom,then scrolling to Top via mouse or pad is lil bit boring,in this regard we can solve this Problem by using jQuery in Blogger.Adding Go To Top or Scroll to Top Button will help your visitors to easily navigate the Blog Content,Specially when there is alot of Contents or users comments.These Buttons have beautiful fade in and out Effect,it float in the blog and when one click the upper button it slides to the top of blog,and if one click the bottom button it floats to the bottom of the blog.
Just Scroll below and see ;)


How To Add Go To Top and Go To Bottom Buttons To Blogger

  • A Box Will Pop,Select HTML/JavaScript
  • Now Copy the below Script and paste it into the Box
<script type="text/javascript" src="http://ajax.googleapis.com/ajax/libs/jquery/1.3.2/jquery.min.js"></script> <script type="text/javascript" > /*********************************************** * Scroll To Top Control script- © Dynamic Drive DHTML code library (www.dynamicdrive.com) * This notice MUST stay intact for legal use * Visit Project Page at http://www.dynamicdrive.com for full source code ***********************************************/ var scrolltotop={ //startline: Integer. Number of pixels from top of doc scrollbar is scrolled before showing control //scrollto: Keyword (Integer, or "Scroll_to_Element_ID"). How far to scroll document up when control is clicked on (0=top). setting: {startline:100, scrollto: 0, scrollduration:1000, fadeduration:[500, 100]}, controlHTML: '<img src="https://blogger.googleusercontent.com/img/b/R29vZ2xl/AVvXsEgBF5-TctKKuV3LecQl26ysRMYNu6XGdHiPetqUshq-k7rsI9oOznRQoprtavg5Sb3DIRHV_CeU6efldhOIDdWAaPATAwYI-_8ePxB9ggX8tO1uK8aMxzAtyYzPwBTzR9ryhRnNZh-bl-k/h120/scroll-to-top.png" />', //HTML for control, which is auto wrapped in DIV w/ ID="topcontrol" controlattrs: {offsetx:5, offsety:5}, //offset of control relative to right/ bottom of window corner anchorkeyword: '#top', //Enter href value of HTML anchors on the page that should also act as "Scroll Up" links state: {isvisible:false, shouldvisible:false}, scrollup:function(){ if (!this.cssfixedsupport) //if control is positioned using JavaScript this.$control.css({opacity:0}) //hide control immediately after clicking it var dest=isNaN(this.setting.scrollto)? this.setting.scrollto : parseInt(this.setting.scrollto) if (typeof dest=="string" && jQuery('#'+dest).length==1) //check element set by string exists dest=jQuery('#'+dest).offset().top else dest=0 this.$body.animate({scrollTop: dest}, this.setting.scrollduration); }, keepfixed:function(){ var $window=jQuery(window) var controlx=$window.scrollLeft() + $window.width() - this.$control.width() - this.controlattrs.offsetx var controly=$window.scrollTop() + $window.height() - this.$control.height() - this.controlattrs.offsety this.$control.css({left:controlx+'px', top:controly+'px'}) }, togglecontrol:function(){ var scrolltop=jQuery(window).scrollTop() if (!this.cssfixedsupport) this.keepfixed() this.state.shouldvisible=(scrolltop>=this.setting.startline)? true : false if (this.state.shouldvisible && !this.state.isvisible){ this.$control.stop().animate({opacity:1}, this.setting.fadeduration[0]) this.state.isvisible=true } else if (this.state.shouldvisible==false && this.state.isvisible){ this.$control.stop().animate({opacity:0}, this.setting.fadeduration[1]) this.state.isvisible=false } }, init:function(){ jQuery(document).ready(function($){ var mainobj=scrolltotop var iebrws=document.all mainobj.cssfixedsupport=!iebrws || iebrws && document.compatMode=="CSS1Compat" && window.XMLHttpRequest //not IE or IE7+ browsers in standards mode mainobj.$body=(window.opera)? (document.compatMode=="CSS1Compat"? $('html') : $('body')) : $('html,body') mainobj.$control=$('<div id="topcontrol">'+mainobj.controlHTML+'</div>') .css({position:mainobj.cssfixedsupport? 'fixed' : 'absolute', bottom:mainobj.controlattrs.offsety, right:mainobj.controlattrs.offsetx, opacity:0, cursor:'pointer'}) .attr({title:'Scroll Back to Top'}) .click(function(){mainobj.scrollup(); return false}) .appendTo('body') if (document.all && !window.XMLHttpRequest && mainobj.$control.text()!='') //loose check for IE6 and below, plus whether control contains any text mainobj.$control.css({width:mainobj.$control.width()}) //IE6- seems to require an explicit width on a DIV containing text mainobj.togglecontrol() $('a[href="' + mainobj.anchorkeyword +'"]').click(function(){ mainobj.scrollup() return false }) $(window).bind('scroll resize', function(e){ mainobj.togglecontrol() }) }) } } scrolltotop.init() </script>

  • Now Click On Save and that's it.
So What's Up:- This is just an extra Widget for Blog,many Bloggers search for this,therefore i add it into my tutorials,this widget has no effect on Blog Loading Speed,Drop your Comments Below,Stay Blessed,Happy Blogging.

How To Add Beautiful Divider(image) Between Each Comment in Blogger

The Comments Section of a Blog is the most important section,Actually readers ideas about the blog Contents are reflected in this Section.Keeping in view this thought you should make your Blogger Comment Section more accessible and neat.To make your Comments Section navigative you should add a divider between each comment,otherwise it just become a jumble of letters and makes the visitors flee away.So be Professional and make your Comments Outlook attractive and Stylish,now How to do,Follow the below steps.

How To Add Beautiful Divider(image) Between Each Comment in Blogger

  • Go To Blogger Dashboard
  • Click On Template
  • Now Click On Edit HTML
  • Now Search for This Tag ]]></b:skin>
  • Now Copy the Below Script and just paste it above ]]></b:skin> tag
Note:- The Below Script is for New Style Comments i.e threaded comments(with reply option)
.comment-block {
background-image:url(https://blogger.googleusercontent.com/img/b/R29vZ2xl/AVvXsEhFXz7OUHIgaFmCpCBx24nkWcLvVykpLDBTDhwTL2FhFzGeoeuPnq3qJJb8A8zJdiI1IdORhpmU7wgzLxkpbJytl21a2CpUco0H3UOn-bkBO72Zvp4Zq1T39oPJBAzbkTf7rXzpJtW7TUv1/s1600/separater.png);
background-repeat:no-repeat;
background-position:center bottom;
padding-bottom:30px;
margin-top: -10px;
}
.comments .continue {
border-top: 0px solid $(widget.alternate.text.color);
}
Note:- The below script is for old commenting system(with no reply option)

#comments-block .comment-footer { background-image:url(https://blogger.googleusercontent.com/img/b/R29vZ2xl/AVvXsEhFXz7OUHIgaFmCpCBx24nkWcLvVykpLDBTDhwTL2FhFzGeoeuPnq3qJJb8A8zJdiI1IdORhpmU7wgzLxkpbJytl21a2CpUco0H3UOn-bkBO72Zvp4Zq1T39oPJBAzbkTf7rXzpJtW7TUv1/s1600/separater.png); background-repeat:no-repeat; background-position:center bottom; height: 50px; }

  • For Changing the Divider image Change "https://blogger.googleusercontent.com/img/b/R29vZ2xl/AVvXsEhFXz7OUHIgaFmCpCBx24nkWcLvVykpLDBTDhwTL2FhFzGeoeuPnq3qJJb8A8zJdiI1IdORhpmU7wgzLxkpbJytl21a2CpUco0H3UOn-bkBO72Zvp4Zq1T39oPJBAzbkTf7rXzpJtW7TUv1/s1600/separater.png" with your Own image url.
  • For changing the height of the image in Old Commenting System change the value 50.
  • Increase or decrease the padding in threaded comments by changing the value of 30px.
  • And Now just hit Save Template and that's it ;)

So What's up

Making Changes in Blogger Template is not easy,but it is interesting ;),make your comment style more beautiful by adding a divider image,stay Blessed Happy Blogging.