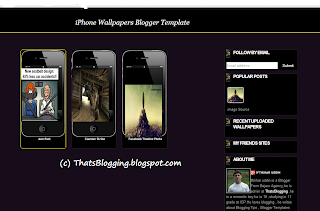
iPhone Wallpapers Blogger Template

iPhone Wallpapers Blogger Template

iPhone Wallpapers Blogger Template is a new awesome Gallery style Blogger Template.Actually this template is specially design for Wallpapers Blog.This Template is designed by Lasindu Nadishan and its author is CoolBthemes.This Template is SEO Ready Template.It has one right sidebar which makes it more attractive template.It has black background.It has beautiful social sharing buttons which will help you to get more likes,tweets and pins.This template has 2 columns layout along with beautiful header.iPhone Wallpapers Blogger Template works with all type of Browsers such as Google Chrome,Internet Explorer and Mozilla Firefox etc.You Can easily download this template from Our Blog.

Download Link credit Goes to CoolBthemes

Features of iPhone Wallpapers Blogger Template

  • SEO Ready
  • Ads Ready
  • 2 Columns
  • Top menu
  • Right Sidebar
  • Social Share buttons
  • Works with all Browsers
  • Dark
  • Black
  • Gallery Style
  •  Beautiful Page Navigation

Extra Information for Wallpapers Blogger Template

iPhone Wallpapers Blogger template is specially designed for Wallpapers blogs,however you can use it for any blogs.iPhone Wallpapers Blogger Template has many beautiful features,every picture is framed in an iPhone.Different social sharing buttons makes it more cool template.Now time to install this template.If you can,t install this template just read the below article and install this template easily to your Blog.

So What's Up:- Share your ideas about this template with us,if you have any question,ask freely,we are here to answer you :),Stay Blessed , Happy Blogging.

Wikipedia Search Box Widget For Blogger

wikipedia-logo
image Source
I just get bore of search boxes,you may have seen many search boxes,but recently Blogger has introduce a Beautiful Wikipedia Search Box for Blogs.Actually this Search Box will help the visitors to easily search any related contents or any idea in his/her mind.This search box is actually the Wikipedia Search Box,and as we all know that Wikipedia is an ocean of  Knowledge,so One can get alot of knowledge.This search box will help your blog visitors to easily search Wikipedia articles without leaving your blog/website.I will suggest this widget for informative blogs or blog related to knowledge etc .However you can add this widget any where in the blog.


How To Add Wikipedia Search Box Widget To Blogger

Adding Wikipedia Search Box is very easy,you have to add a widget from Blog Layout Section and that's it so let's see how to do this.

  • Sign in to your blogger account
  • Now Click On layout
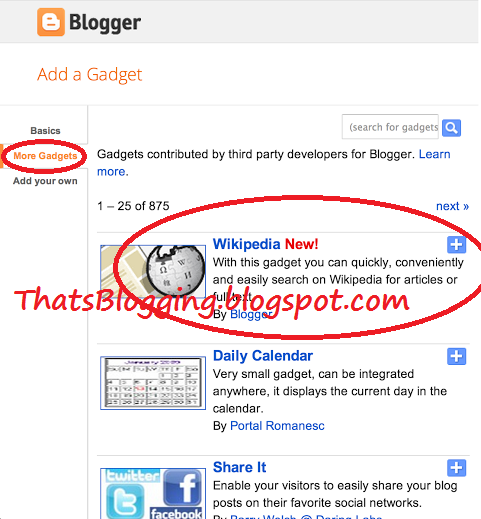
  • Now Click On Add a Gadget/Widget
  • A Box will pop up
  • Now take a look at the right most side
  • Click On more Gadgets Option
  • Now You will see many widgets but the Wikipedia Search Box will be at the top ( As Shown below)
wikipedia-search-box-for-Blogger
  • Now Just Click on the + Sign and that's it,your widget has successfully added.
  • Now Take a look on your blog you will see Wikipedia search Box.
  • Now If you type something for search it will seems as below picture

So What's Up:- Did you Like this Widget?How is its Look on Blog?It will help you visitors to Search Easily?Share your beautiful ideas with us :) Stay Blessed , Happy Blogging.


Top 5 Killer Tips To increase Blog Traffic


Is Your blog traffic low?Do You want a flood of traffic to your Blog? Of course Yes,this is the major issue of all bloggers,they want to increase their website/blog traffic,they work hard but still they get only 100-200 page-views daily.Its actually due to some wrong steps,if you are one of that worried bloggers,then don,t worry you are at the right place.Here i will share some killer tips which will surely help you to boost up your blog traffic.Actually there are many method via which you can easily increase your Blog traffic but that traffic is still not sufficient,because hardly you can reach up to 500-100 page views.There are also some paid method i.e you have to pay for getting traffic,but that is not good for your blog/website.Paid traffic can harm your AdSense Earning and website reputation.So here is some killer tips which will surely enhance your Blog Traffic and Rank.


Top 5 Killer Tips To increase Blog Traffic

Increasing traffic is not the game of kids,but we are going to share some killer tips which will helps the newbies to increase their blog traffic along with high Page Rank.

  • As we all know very well,that social networks such as Twitter,Facebook,Pinterest etc are the most popular and high rank networks.So i will suggest you to never underestimate Social Networking websites.Always be in touch with your friends,followers and fans.You can make pages in Facebook,but remember many People have created some shit pages which is just for wasting time,but you will never do that,make a beautiful professional look page and after creating publish your blog contents there.By doing this i can guarantee that you will get huge traffic to your blog/websites.Next thing which is most common use pinterest for pinning your contents,according to bloggers in 2013 the pinterest is the most sophisticated source of getting unique visitors.Like wise twitter can now help you to boost your traffic i.e tweet your articles/blog contents with your fans and followers.In short Social Networking websites helps the Bloggers to get a huge amount of traffic to their blogs/websites.
  • Now let's strong the base of your blog/website by building back links.The Question arise is that How to Build Backlinks? So let me explain it.You can get backlinks to your blog/website by many ways,but the most common way every blogger is using is called commenting.Commenting is a process via which we share our ideas, thoughts and experience with other People.Bloggers also do comments on different contents such as blogging niche websites/blogs or any other tech blogs.By doing this you can get backlink by simply adding your blog/website link in comment box(remember never spam on Professional Blogs some time it can harm your website/blog) so be cooperative and social.Pass comments in a beautiful way to impress the admin and at last add your blog link.You can also create back links by writing articles,reviews and other information on directory websites which allow you to post for free.As a result of back-linking your blog will start getting organic traffic from Google and other Search engines and your blog/website page rank will increase quickly.
  • Another interesting and beautiful way to get traffic to your blog/website is from Forums.Sign up to the forums related to your blog niche.There you will get alot of opportunities to share your views.Users can ask you Questions,and you will have to answer them.So while answering them you can refer them to read your blog article.
  • Use Simple and Clean Blogger Template,you may have seen many blog which takes too much time to load. Therefore when some one visit that blog,he will never try to look back at that blog due to its loading speed.Actually the world is too much busy,no one wants to lose his/her time.Therefore i humbly request you that if you want traffic don,t install a boring template with many JavaScript widgets.Simplicity its self is beauty,according to this quote always be simple and creative,never add bullshit JavaScript widgets it slow down your blog speed.By doing this i guarantee you will get a flood of traffic to your blog/website.
  •  The last and most important tip is How To Write an Awesome Article to impress your Blog Visitors?So read the below tips for writing an awesome article.
  1. Always write according to your blog Niche.
  2. Never Copy the post,be original,don,t try to be copycat.
  3. Always write 300+ article(Remember the post doesn't depends upon the length but the thing is How You write,Write little but impressive and awesome article).
  4. Always be unique,don,t copy other bloggers style,You are different so challenge the world and become a Pro.
  5. Use images in Article,also do SEO(Search Engine Optimization)for images.
So What's up: All the above tips was in my mind if you have any idea,tips,and advice feel free to share with us :)

    Display Profile Picture in Google Search Results

    Display Profile Picture in Google Search Results

    Google can now easily display your Profile Picture and Name in Search results next to your Blog Contents.Actually This Picture and name comes from your Google+ Account.This Picture represent  true Authorship of Your Contents on Search Results.According to my experience Profile Picture in Google Search Result is naturally attracted to visitors,so a flood of traffic will start to your blog.Now Let's learn how To implement this in Blogger.


    How To Display Profile Picture in Google Search Results

    Now If you are interested to show your Profile Picture in Google Search Result,here is some steps,follow these and easily get your Profile Picture in Google Search Results.Actually all you need is the below 3 things.
    • A Blog or Website
    • A Google+ Account
    • And an About me page in your Blog.
    If You already have did the above 3 steps then follow the below easy steps.
    • Add the below script/Code on your blog any where i.e at sidebar or footer .
    • <a href="https://profiles.google.com/HerePasteYourG+ID"rel="author">My Profile</a>
    • Don,t change the script just change HerePasteYourG+ID with your own Google+ ID.You can get your Google+ Profile ID by visiting your Profile as shown below in the picture.

    • Now next step is go to your About me page and add the below link any where in about me page.
    <a href="https://plus.google.com/YourG+ ID"
      rel="me" target="_blank">G+ Profile</a>
    • Replace YourG+ ID with your G+ ID , however you can also change G+ Profile to any text you want. 
    • Now You have to link your Website/Blog to Contributor Section.
    • Visit Your Google+ Account>>Edit Profile>>Add your website/blog link to the "Contributor to" List as shown below.
    Display Profile Picture in Google Search Results

    • Not the last and most important thing is uploading a Profile Picture to Google+ Account,Actually this Profile picture will comes in any search results.So upload an awesome Photo,Remember if your Picture is 160px by 160px ir will look great.And now just save your Profile.That's it.
    • Now Time for Checking.Either its working or nope? So for Checking visit the Google Rich Snippet Tool and enter your blog/website URL and hit preview .Now if its working perfect it will show the result as shown below in the Picture.
    • That's it,if its not working with you read the below Tips.

    Some Extra Tips

    If You did the Above Steps correctly and Google is still not Showing Your Profile Picture in the Search Results,so try the below steps.
    • Complete your Author Page i.e About me with all required data and a picture(the Picture should be Google+ Account Profile Picture).
    • Make sure that you have added correct name similar to your Google+ Account.
    • The main step is your Google+ Profile should be complete.
    • And one another thing i personally observed that you must add some circles.
    So What's Up:- Displaying Picture in Google Search result makes me more professional and visitors will be surely attracted by your Profile Picture if it is Awesome :D and if you have uploaded Ghost Picture then :D , stay blessed , Happy Blogging .

    Top 5 Professional Free Blogger Templates

    Blogging is now-a-days a great way to share your knowledge with the world.Blogging Platform Provide an easy way to publish your contents worldwide.So Do You want to Create a Blog?If Yes,Then You Can but whenever a new blogger creates a blog,he/she just chose the blogger default template which is looking boring in real.A flood of Templates are coming to the blogging world,these Blogger Templates are made by different Authors.These Blogger Templates are Professional Blogger Templates,by using these professional blogger templates you will never see your visitors bore.These templates have alot of features such as High loading speed,cool look,responsive,magazine style,3 columns,2 columns along with different widgets and drop-down menus.For this purpose we have collect Top 5 Professional Blogger Templates,hope you will found these interesting. 


    How To Download and install These Blogger Templates?

    If You want to download any of the below blogger template,we have provided the Download Link along-with Live Demo.So For Downloading just click the Download Link and Download the Template.Now if you are new blogger and you don,t know how to install or how to backup your blog template i will suggest you to read this article (Installation Complete Guide).

    Top 5 Professional Free Blogger Templates 2013

    We have a Top 5 List,Hope You will love it,So have a look and pass your comments,if you have any question must share with us,stay Blessed :)

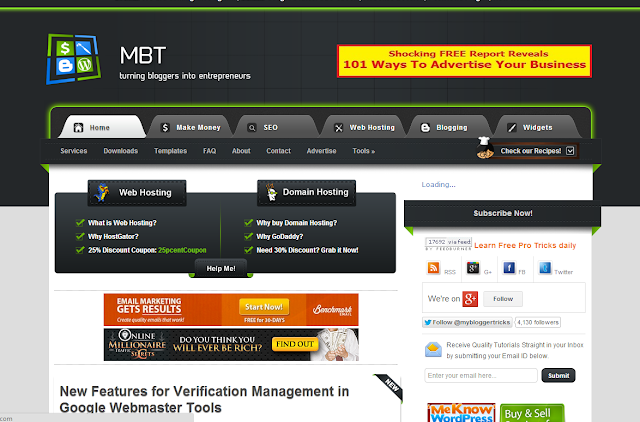
    MBT(My Blogger Tricks) Blogger Template V 2.0 

    MBT Blogger template V 2.0 is a professional template Designed by Muhammad Mustafa (MBT Owner).This Template is a fantastic template for Blogging,and tech blogs.This template has 3 columns layout along with beautiful drop down menu.This Template is SEO Optimized template.MBT Blogger template V 2.0 is ads ready template.It has Automatic Read-more option,author box and social share widgets.This template works with all type of browsers such as Google Chrome,Mozilla and Internet Explorer etc.MBT Blogger template is a responsive Template with beautiful black color background which makes it more awesome template.
    Template By MBT
    mbt-blogger-template-v-2


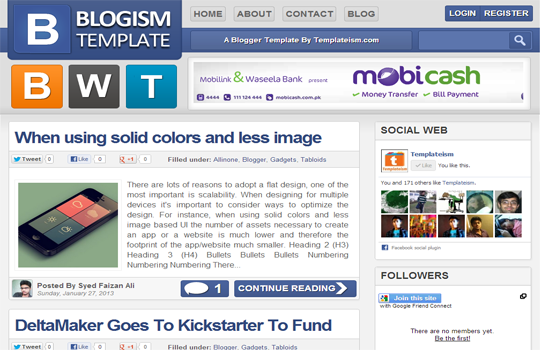
    Blogism Blogger Template 2013

    Blogism Blogger Template is design by a young Blogger Syed Faizan Ali (MBL Owner) from Pakistan,This Template is specially designed for Tech Bloggers .Blogism is ads ready template,it has One right sidebar and beautiful share buttons below the posts. Blogism Blogger Template has awesome header which makes it more beautiful Template.It has 2 columns layout.Blogism template has read-more option,it has author avatar with each post.This Template works with all type of Browsers such as Google Chrome,Mozilla Firefox and Internet Explorer etc.
    Template By Templatism
    Blogism Blogger Template Large Layout


    Lord HTML Blogger Template

    Lord HTML Blogger Template is a new free Blogger Template design by Durai Sankar,its author is LORDHTML. Actually Lord HTML Blogger template is a clean and responsive Blogger template,it is also for Blogging and Tech blogs.However you can use it for any type of Blog.This template is ads,and SEO Optimized Template.It has no Footer,however it has one beautiful right sidebar along-with drop down menu which makes it attractive template.Moreover it has a search bar,page navigation widgets,social buttons,readmore option,and HTML Code View.This template works with all type of Browsers such as Google Chrome etc.You can Download it free from our Blog.
    Template design by Durai Sankar


    Labnol Blogger Template

    Labnol Blogger Template is a Professional Blogger Template design by Labnol.Org.This template is designed by the Pro Blogger Of India,this template has many features such as Simple and Clean design,it has One right sidebar,This template is Purely SEO Optimized.The Loading Speed of this template is very fast.Labnol Blogger Template has white background which makes it more attractive template.However it works with all type of browsers such as Internet Explorer etc.You Can easily Download this template from Our Blog.
    Template designed by Labnol
    labnol blogger template

    Spice Up Your Blog Template

    The last and most beautiful Blogger Template is Spice up Blogger Template which is designed by Durai Sankar.This Template is ads Ready template,it has awesome ads options.This template has 3 columns layout.It has ready Brown Color Drop Down menu.This template has Subscription widget and Own Fonts.This template has One Right Sidebar along with beautiful header which increase its beauty.This Template has ready Social Buttons which will surely help you to get more Facebook Page Likes,Twitter Tweets etc.However this template works with all type of browsers.You Can Download it free from Our Blog.
    Designed by Durai Sankar.
    Spice-up-your-blog-Blogger-Template


    What's Up:- Have You Seen These Templates?Aw These are Really very Cute and Awesome Templates.These are called Professional Blogger Templates,I Hope you like it,must pass your comments,stay blessed,Happy Blogging :)

    # You May Also Like it Rapture Blogger Template.(Photography Blogs)*
    # You May Also Like it Clean white Blogger template(Blogging and tech Blogs)*
    Top 5 Professional Free Blogger Templates
    Last Reviewed by Iftikhar uddinon June 24 2013
    Rating: 5
    How To Create Facebook Timeline Cover Photos

    thatsblogging
    Facebook is young,and is offering alot of entertainment to users.Facebook was started in 2004,founded by Mark Zuckerberg. The decade of Facebook will complete in 2014,and its popularity in these years can,t be express in words.Facebook has billions of active users.According to new research Facebook is  at 2nd in the race of active users and earner.Due to this popularity now-a-days a person is considered illiterate if he haven't a Facebook Account.Moreover Facebook Provides some extraordinary activities such as Playing Games,making pages,making groups etc,but now-a-days Facebook has just introduced timeline Feature which help the user to update his timeline Photo on Facebook.This timeline Photo makes the Facebook Profile beautiful and attractive.Most of friends do it for impressing their girlfriends or to show off to their friends.So here in this regard we have found a new way to Create your own Facebook Timeline Photos.In this method you can create/edit and modify any picture for your Facebook Timeline.

    How To Create Facebook Timeline Cover Photos

    There are some websites which are very much famous for creating beautiful and attractive Facebook Timeline Photos. TrickedOutTimeLine is one of these websites which helps the users to create beautiful and stylish Facebook Timeline Cover Photos easily. TrickedOutTimeLine gifts you with four type of effects such as  merged Photos,Jigsaw piece,torn paper effect and Picture Zooming Effect.So Let's see how to use these effects.
    create-time-line-cover-photos
    • First of all Visit TrickedOutTimeLine Website
    • Now Scroll Down,you will see four options.
    • Select any Effect You want to apply to your Photo.
    • Now another Box will popup,there click on upload photo (you can upload photo from your PC or You can also share from your Facebook Albums).
    • Now Edit and crop Picture as you wish.
    • You can easily preview your image by clicking preview option.
    • And Now Just Click On Done that's it :)
    • Note:- TrickedOutTimeLine Never Save Your Personal Photos.

    How To Add Cover Photo To Facebook Timeline?

    • Go To Facebook.com
    • Sign in There with your E-mail and password.
    • Now Click On Profile
    • Now You will see your Profile,There move your mouse to the timeline and you will surely see an option of Change Cover Photo as Show Below.
    adding cover photo
    • Now Select "Upload Photo" another box will pop,Now Select Your Photo and That's it :)
    What's Up:- Creating Facebook Timeline Cover Photo is extremely easy,this timeline cover photo makes the profile more stylish.So be stylish and have fun,stay blessed Happy Blogging  :)

    Add Floating Vertical Bar With Share Buttons To Blogger

    You may come across many blogs where a vertical floating bar with share button is present at the left side or right of the blog posts.This Floating Vertical Bar is actually a blogger widget which helps the blogger to get more Facebook page likes,twitter tweets,and stumbles etc.This widget is very useful for visitors to easily share your blog/website contents.This widget is already posted by many bloggers but actually that is static or something else,but the widget we are going to share is Floating Vertical Bar with The Beautiful Share Buttons.
    Add Floating Vertical Bar With Share Buttons To Blogger
    image Source Making Different

    How To Add Floating Vertical Bar With Share Buttons To Blogger

    Adding Vertical Floating Bar with Social Buttons To Blogger is very easy.You have to Copy a snippet of Code,and then you should have to add it into the HTML/JavaScript Box.However let's take a look on these steps.
    • Visit Blogger.com and sign in there.
    • Now Visit Blogger Dashboard.
    • Click On Layout
    • Now Click On Add a Widget/Gadget
    • Now a Box will popup 
    • Select HTML/JavaScript
    • Now Copy the Below Script and paste it into HTML/JavaScript Box.
    <a href='http://thatsblogging.blogspot.com'><img alt='Floating Vertical Bar With Share Buttons widget by ThatsBlogging' src='https://blogger.googleusercontent.com/img/b/R29vZ2xl/AVvXsEhZTyJROZWz7vBelTEPvU-TvZ-8NM4sUNoNThxfPLCowDhrHJ-df3n8L_y8FZGIHUWczTeN8UsaT9bhOSU4Jr53FPziUs0ktu-7WMAfZd40p6l4ecXgDLKCp8VBd8EqTMbJBxCXmZdx7MmU/s1600/best+blogger+tips.png'/></a><div class="addthis_bar addthis_bar_vertical addthis_bar_large" style="background:#98A2A7; border: 1px solid #000000; top:120px;left:50px;">             <div class="addthis_toolbox addthis_default_style">                 <span><a class="addthis_button_facebook_like" fb:like:layout="box_count"></a></span>                 <span><a class="addthis_button_tweet" tw:count="vertical"></a></span>                 <span><a class="addthis_button_google_plusone" g:plusone:size="tall"></a></span>                 <span><a class="addthis_counter"></a></span>             </div> </div> <script type="text/javascript" src="http://s7.addthis.com/js/300/addthis_widget.js"></script>

    • Now hit save and that's it !

    Live Demo Of Vertical Bar with Social Share Buttons  


    Tip For Bloggers:- Adding To many JavaScript Widgets will surely make your website/blog speed slow,so be careful,don,t add extra and useless JavaScript widgets To You Blog.Some Blogger just want to decorate his/her blog like bride.But actually its a great foolishness,because simplicity its self is beauty :)
     
    What's Up:- You Add This To your Blog?You Already added this?You don,t want to add this to Your Blog?Any Question Related this Post?Ask Freely ,stay blessed,Happy Blogging.


    Add Floating Vertical Bar With Share Buttons To Blogger
    Last Reviewed by Iftikhar uddinon June 24 2013
    Rating: 5

    Add Facebook Send Button To Blogger 2013


    Add Facebook Send Button To Blogger 2013

    Whenever Bloggers post an article they want to spread that article like fire in the forest,the question is why the Do this?Because the more you get the views of the article the more popular your blog will be?And if you have a relationship with AdSense then it will help you to LOW the Page CTR.However due to high page-views your blog Alexa and Search result increases.On this purpose i am going to share Facebook Send button which will surely help your blog visitors to easily share any article of your Blog To Facebook.

    Live Demo For Facebook Send Button

    Check The Send Button Below The Live Streaming.

    How To Add Facebook Send Button To Blogger

    Installing Facebook Send Button is very easy,you just need to copy the below script and paste it before the below mentioned tag.
    • Sign in to your Blogger Account
    • Visit the Dashboard
    • Now Click On Template(Shown below)
    • Edit HTML
    • Now Proceed it
    • Check the Small Box "Expand Widget Templates"
    • Now Search For This Code <data:post.body/> by pressing CTRL+F.
    • Now Copy the below Script .
    <div id="fb-root"></div>
    <script>(function(d, s, id) {
    var js, fjs = d.getElementsByTagName(s)[0];
    if (d.getElementById(id)) return;
    js = d.createElement(s); js.id = id;
    js.src = "//connect.facebook.net/en_US/all.js#xfbml=1";
    fjs.parentNode.insertBefore(js, fjs);
    }(document, 'script', 'facebook-jssdk'));</script>
    <div class="fb-send" expr:data-href="data:blog.url"></div>
    Now You have two Choices i.e where you want to add Facebook Send Button ? Either Above The Post or below the Post.

    Adding Facebook Send Button Above The Blogger Post

    For Adding the Send button above the Blogger Post Copy the above Script and paste it above <data:post.body/>.And hit save Template,that's it :)

    Adding Facebook Send Button Below The Blogger Post

    Now For Adding the Send Button Below the Blogger Post Copy the Above Code and paste it after <data:post.body/> , and hit save template that's it :)
    Note:- Before Pasting Code into Template must take backup of your template(if you can,t take backup of Template Read This Article) .In Magazine Blogger Templates <data:post.body/> is present 2 or 3 times so paste the above code 2 and 3 times.

    Conclusion

    So What's Up? This was all about adding facebook send button to Blogger , if you have any funny question ask freely , we are here to answer you :)

    How To Add Facebook Like Box To Blogger 2013


    Adding Facebook Like Box to Blogger is a new trend of bloggers,which helps them in getting a huge amount of traffic from the popular social network called Facebook.Facebook provides the "page feature" for users which is the main source to develop a healthy relationship with blog readers.Facebook Page also helps to give updates to the regular visitors and lovers of your Blog.However in this regard blogger comes with a Like Box , through which you can get Facebook Page likes.This Like Box is little bit different from other Like Boxes.We have already posted a Popup Facebook Like Box,but this one box is static and new one hope you will like it , its installation is also very easy.


    LIVE DEMO OF FACEBOOK LIKE BOX


    How To Add Facebook Like Box To Blogger

    Installing this Like Box is very simple , you have to add a simple script into HTML/JavaScript Box.
    • Go To Blogger Dashboard.
    • Now Click On Layout.
    • After that Click On Add a Gadget.
    • A Box will popup Select HTML/JavaScript.
    • Now Copy the Below Script and paste it in HTML/JavaScript Box.
    <iframe src="//www.facebook.com/plugins/likebox.php?href=http://www.facebook.com/Thatsblogging&amp;width=300&amp;height=248&amp;colorscheme=light&amp;show_faces=true&amp;border_color&amp;stream=false&amp;header=false&amp;" style="border:none; overflow:hidden; width:300px; height:248px;" ></iframe>

    • Now just hit Save and that's it !

    Changing in the Script/Code 

    Before pasting the script into the HTML/JavaScript box replace the username of Facebook page to your Own Facebook page User name i.e"ThatsBlogging".Another thing if you want to change the width or height of the Like Box,it can be done easily,just change the values of width and height as indicated with red i.e 300 and 248.Now Copy and paste it in the HTML/JavaScript Box , stay Blessed ,HAPPY Blogging.

    Don,t be a lazy bum,if you have any question just type in the comment box and also post it :) We are here to help you.

    Top 5 Free Online LOGO Makers 2013

    LOGO ; is a graphical small picture/mark usually used by Organizations,Companies,and high Profile Services.However now-a-days Bloggers have introduced that without LOGO a website/blog can,t be considered professional.LOGO represent the bloggers inner personality along with his Professionalism in Blogging LOGO helps the visitors to easily recognize a Blog/website.LOGO makes your blog more attractive which is the Plus Point To Blog Your Blog.But now the problem is How To Design LOGO ? Because creating logo is not kids game,it need high skills of Photoshop or Coreldraw,in this regard for the convention we have collected some websites which will help you to Automatically generate/create logo online for Free.


    • Cool Text ; The first and awesome free Online LOGO maker website is COOL Text,this website provide totally GUI Interface,you have to just select the text style and type the LOGO Text which you want to generate and click on Render image , that's it :)


    • Flaming Text ; It is the 2nd most popular Online LOGO maker website,FlamingText provides bundle of fonts styles along with beautiful styles,it is also very simple to use,Select any Style and click that , now enter the logo text and click on Generate , that's it.Flaming Text website has many other tools such as arrow maker,bullet maker and URL Encoder/Decoder etc.
    • LOGO Type Maker; It is another cool Online LOGO Maker,this is same as COOL Text and flaming text however it provides an icon alongwith the logo text which makes it more awesome LOGO.Its use is also too much simple , just drop your text in the box and click on Generate and download your LOGO.
    • LOGOYES; It is another beautiful Online free LOGO Maker website,it generates logo when you signup for their website,so first sign up there and enjoy making different LOGO.Its really very fast and easy.
    • Online LOGO Maker;This website provides a wide variety of LOGOS along with beautiful icons in the LOGO.According to their website "It is a Professional LOGO Maker website".Its free and very fast , you can easily generate LOGO for your website.
    So wake up and make your blog LOGO via this websites , and be professional , thanks for landing on ThatsBlogging.Blogspot.com , Hope you will like it , if you have any question you can ask , we are here to reply you , stay blessed,Happy Blogging.

    ThatsBlogging


    Rapture Blogger Template 2013

    Rapture Blogger Template is a new stylish Template by SoraTemplates,it has 2 columns layout ,actually this template is converted from WordPress to Blogger so it has a cool WordPress Look.Rapture Blogger template has wooden brown background which makes it more attractive template,it has one right sidebar along with fixed width.This template works with all type of Browsers such as Google Chrome , Internet Explorer and Mozilla ETC.You can Download it free from Our website.

    ThatsBlogging.blogspot.com

    • SEO Ready Template
    • Ads Ready
    • Top Navigation
    • One Beautiful Right sidebar
    • Space between posts
    • 2 columns layout
    • WordPress look
    • Elegant 
    • Wooden Background
    • White
    • Personal
    • Brown
    Rapture Blogger Template is fit for Tech and Wallpapers Blog however you can use it for any type of blog, it has wooden background which makes it cool template,its Author is SoraTemplate.com.

    How To install Rapture Blogger Template 2013

    If you can,t install this template to your Blog , then click on the link below it will redirect you to a new page where you will get the complete guide of How to install a template .
    Note :- Before installing Blogger Template must backup your template , stay blessed , Happy Blogging :)

    About Iftikhar Uddin


    Iftikhar Uddin is a passionate blogger from Bajaur Agency KPK ,he is running a number of blogs.He started Blogging Since 2013,he loves to write Latest Blogging Tips and tricks.He is in 11 Grade studying at ICUP .He is 16 ,in the age of 15 he start playing with Blogging and now he is Admin at ThatsBlogging.He is a romantic Boy,you can catch him on Facebook and Twitter.

    Add Adsense Above/Below The Blogger Posts

    Adding Adsense inside Blogger posts will surely help you to increase the revenue,however every coin has two sides,you must take care of the page CTR.Because this trick will help you to get more clicks on your Ads as compared to ordinary clicks.This is really useful for those bloggers who has high page views but less clicks,so be happy now you can earn alot,let's see how to add Adsense Between the Blogger posts.


    How To Add Adsense Between The Blogger Posts


    • The First Step is that you have to login to your Adsense Account >> Create new ad unit .
    • Then Copy the Adsense Code from there and Parse it via Adsense Code Converter Tool.
    • Now Add the parsed Code in the below Script/Code
    <b:if cond='data:blog.pageType == "item"'>
    Paste the Parse Adsense Code here
    </b:if>
    • Now Copy the Above Script and Go To Blogger Dashboard.
    • Click On Template As Shown Below
    • Now Click on edit HTML and Proceed that.
    • Check the small Box "Expand Widget Template".
    • In this Step Search for this Code <data:post.body/> .
    • Note :- In Magazine Blogger Template you may found the Above Code two or three times , so do the below step for All.
    • Now If you want to Show your Adsense Ads Above the Post So Paste the Above Code up this Code <data:post.body/> .
    • And If You want to Show Adsense Ads below the Blogger Post so Copy the Above Script and paste it below <data:posts.body/> .
    • Now save template and that's it !
    If You want to Add Adsense Ads on right Side of the Blogger Post the Follow the below Steps

    Adsense Ads at Right Side

    • Copy the below Script (must add the parsed Code in the Script)
    <b:if cond='data:blog.pageType == "item"'> <div style="float:Right;">Paste the Parsed Adsense Code here </div></b:if>
    • Go To Blogger Dashboard 
      • Click On Template As Shown Below
      • Now Click on edit HTML and Proceed that.
      • Check the small Box "Expand Widget Template".
      • In this Step Search for this Code <data:post.body/> .
      • Note :- In Magazine Blogger Template you may found the Above Code two or three times , so do the below step for All.
      • Now If you want to Show your Adsense Ads Above the Post So Paste the Above Code up this Code <data:post.body/> .
      • And If You want to Show Adsense Ads below the Blogger Post so Copy the Above Script and paste it below <data:posts.body/> .
      • Now save template and that's it !
    And If You want to Show the Adsense Ads at Left side of the Blogger Post , do the following easy steps.

    Adsense At Left Side of Blogger Posts

    • Copy the below Script .
    <b:if cond='data:blog.pageType == "item"'>
    <div style="float:left;">
    Paste the Parsed Adsense Code here
    </div>
    </b:if>

    • Now Go To Blogger Dashboard >> Click On Template >> Edit HTML >> Proceed it >> Check the Small Box "Expand Widget Template".
    • In this Step Search for this Code <data:post.body/> .
    • Note :- In Magazine Blogger Template you may found the Above Code two or three times , so do the below step for All.
    • Now If you want to Show your Adsense Ads Above the Post So Paste the Above Code up this Code <data:post.body/> .
    • And If You want to Show Adsense Ads below the Blogger Post so Copy the Above Script and paste it below <data:posts.body/> .
    • Now save template and that's it !
    If you have any question regarding this article must ask , we are here to answer you !

    Adsense Code Converter Tool For Blogger

    Adsense-Code-Generator

    Adsense Code Converter tool will help you to Convert any Adsense Code to a form , which can be added in between the blogger posts . How To Convert Adsense Code via this Tool


    How To Convert AdSense Code via This Tool

    • Copy the Adsense Code from your Adsense Account and paste it in the Box Below.
    • After Pasting Click On the button below "Convert your Adcode".
    • Now This Tool will convert the Adsense Code to a form which can be added any where in the blogger post .
    Adsense code converter For Blogger @ThatsBlogging


    How To Install Any Blogger Template

    Installing Blogger Template to Blogger is very easy Process , but new bloggers some time do a little mistakes and as a result they lost their whole blog posts or template and contents.In this regard today i will show you How to install any Blogger Template to your Blogger.The Process will be explain step by step below , however let me tell you some tips before installing Blogger Template.


    1. Before installing Blogger Template,must backup your template.
    2. How to backup your Template? It will be also discussed below.
    3. Never edit any template ( i mean never remove copy rights of the author , because the author gives that template free to you , so as a credit you should respect him and should not remove his/her credit) ,in case if he get angry he can report your blog to DMCA ,as a result your blog will be deleted.

    How To Backup Any Blogger Template.

    • The first step , sign in to your Blogger Account
    • Blogger Dashboard 
    • Click On Template as Shown Below
    • Now Click On restore/backup at the left most as shown below


    How To Install Any Blogger Template
    • Now Click On Download Full Template
    How To Install Any Blogger Template
    • And That's it !


    How To Install Any Blogger Template 

    • Go To Blogger Dashboard
    • Then Click On Template as shown below


    • Now Click On Restore/Backup as shown below
    • Now a Box will popup , there click on Chose a file ,now select your XML template file and hit upload ,that's it !