How To Add Multi Tabbed Navigation Widget To Blogger


The Multi Tabbed Navigation Widget enables you to Group all the Blog Gadgets in a single container,which can easily be selected via tabs.The main benefit of this widget is to save the Space of your blog,and you will get rid of scattered gadgets,however it also helps you to navigate the blog gadgets easily.Any one can see blog gadgets in a single container just by Clicking the Tab of the specific Gadget.There are several ways of creating tab-views for blogger like jQuery, or with the help of tools,or any script.

How To Add Tabbed Navigation Widget To Blogger
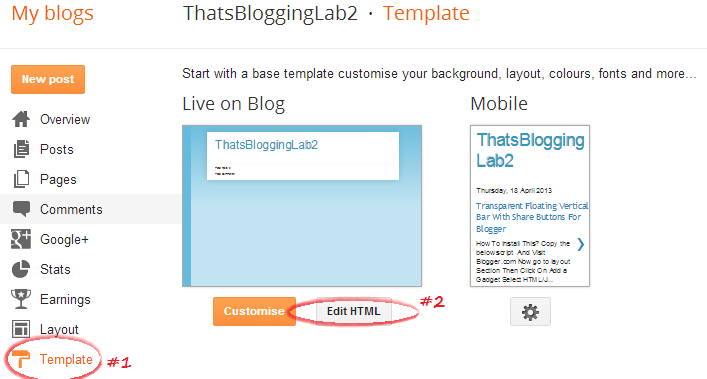


  • Now Expand the Style Section of the Template,just by Clicking the arrow near <b:skin> ... </b:skin> at line 14.
  • Now Search for this Tag ]]></b:skin>
  • Now just above ]]></b:skin> tag add the below script
/* ThatsBlogging Tabview for Blogger
----------------------------------------------- */
.tabviewcont{
margin:15px 0;
padding:0;
clear:both;
}
.tabviewnav {
margin: 0 0 0 14px;
padding:3px 0; /* If you are using a Blogger Template change 0 with 15px */
font-size:12px; /* Font size of text inside tabs */
font-weight:bold;
}
.tabviewnav li {
list-style:none;
margin:0;
display:inline;
}
.tabviewnav li a {
padding:3px 6px;
margin-right:1px;
background:#F6F6F6; /* The background color of the tabs */
border-radius:5px 5px 0 0;
-moz-border-radius:5px 5px 0 0;
-webkit-border-radius:5px 5px 0 0;
text-decoration:none;
color:#222222;
}
.tabviewnav li a:hover {
color:#222222;
background:#EBEBEB; /* Background color of the tab on mouseover */
text-decoration:none;
}
.tabviewnav li.tabviewactive a,
.tabviewnav li.tabviewactive a:hover {
background:#EBEBEB; /* Background color of the active tab */
color:#222222;
}
.tabviewcont .tabviewtab {
padding:5px;
border:1px solid #EEEEEE; /* Border around the container */
background:#fff; /* The background color of the gadget */
}
.tabviewcont .tabviewtab h2,
.tabviewcont .tabviewtabhide {
display:none;
}
.tabviewtab .widget-content ul{
list-style:none;
margin:0 0 10px 0;
padding:0;
}
.tabviewtab .widget-content li {
border-bottom:1px solid #ccc;
margin:0 5px;
padding:2px 0 5px 0;
}


  • Now find </head> Tag
  • Now Copy The Below Script and paste it above </head> Tag
<script type='text/javascript'>
// Tabview for grouping gadgets
//<![CDATA[
document.write('<style type="text/css">.tabview{display:none;}<\/style>');function tabviewObj(argsObj){var arg;this.div=null;this.classMain="tabview";this.classMainLive="tabviewcont";this.classTab="tabviewtab";this.classTabDefault="tabviewtabdefault";this.classNav="tabviewnav";this.classTabHide="tabviewtabhide";this.classNavActive="tabviewactive";this.titleElements=['h2','h3','h4','h5','h6'];this.titleElementsStripHTML=true;this.removeTitle=true;this.addLinkId=false;this.linkIdFormat='<tabviewid>nav<tabnumberone>';for(arg in argsObj){this[arg]=argsObj[arg]}this.REclassMain=new RegExp('\\b'+this.classMain+'\\b','gi');this.REclassMainLive=new RegExp('\\b'+this.classMainLive+'\\b','gi');this.REclassTab=new RegExp('\\b'+this.classTab+'\\b','gi');this.REclassTabDefault=new RegExp('\\b'+this.classTabDefault+'\\b','gi');this.REclassTabHide=new RegExp('\\b'+this.classTabHide+'\\b','gi');this.tabs=new Array();if(this.div){this.init(this.div);this.div=null}}tabviewObj.prototype.init=function(e){var childNodes,i,i2,t,defaultTab=0,DOM_ul,DOM_li,DOM_a,aId,headingElement;if(!document.getElementsByTagName){return false}if(e.id){this.id=e.id}this.tabs.length=0;childNodes=e.childNodes;for(i=0;i<childNodes.length;i++){if(childNodes[i].className&&childNodes[i].className.match(this.REclassTab)){t=new Object();t.div=childNodes[i];this.tabs[this.tabs.length]=t;if(childNodes[i].className.match(this.REclassTabDefault)){defaultTab=this.tabs.length-1}}}DOM_ul=document.createElement("ul");DOM_ul.className=this.classNav;for(i=0;i<this.tabs.length;i++){t=this.tabs[i];t.headingText=t.div.title;if(this.removeTitle){t.div.title=''}if(!t.headingText){for(i2=0;i2<this.titleElements.length;i2++){headingElement=t.div.getElementsByTagName(this.titleElements[i2])[0];if(headingElement){t.headingText=headingElement.innerHTML;if(this.titleElementsStripHTML){t.headingText.replace(/<br>/gi," ");t.headingText=t.headingText.replace(/<[^>]+>/g,"")}break}}}if(!t.headingText){t.headingText=i+1}DOM_li=document.createElement("li");t.li=DOM_li;DOM_a=document.createElement("a");DOM_a.appendChild(document.createTextNode(t.headingText));DOM_a.href="javascript:void(null);";DOM_a.title=t.headingText;DOM_a.onclick=this.navClick;DOM_a.tabview=this;DOM_a.tabviewIndex=i;if(this.addLinkId&&this.linkIdFormat){aId=this.linkIdFormat;aId=aId.replace(/<tabviewid>/gi,this.id);aId=aId.replace(/<tabnumberzero>/gi,i);aId=aId.replace(/<tabnumberone>/gi,i+1);aId=aId.replace(/<tabtitle>/gi,t.headingText.replace(/[^a-zA-Z0-9\-]/gi,''));DOM_a.id=aId}DOM_li.appendChild(DOM_a);DOM_ul.appendChild(DOM_li)}e.insertBefore(DOM_ul,e.firstChild);e.className=e.className.replace(this.REclassMain,this.classMainLive);this.tabShow(defaultTab);if(typeof this.onLoad=='function'){this.onLoad({tabview:this})}return this};tabviewObj.prototype.navClick=function(event){var rVal,a,self,tabviewIndex,onClickArgs;a=this;if(!a.tabview){return false}self=a.tabview;tabviewIndex=a.tabviewIndex;a.blur();if(typeof self.onClick=='function'){onClickArgs={'tabview':self,'index':tabviewIndex,'event':event};if(!event){onClickArgs.event=window.event}rVal=self.onClick(onClickArgs);if(rVal===false){return false}}self.tabShow(tabviewIndex);return false};tabviewObj.prototype.tabHideAll=function(){var i;for(i=0;i<this.tabs.length;i++){this.tabHide(i)}};tabviewObj.prototype.tabHide=function(tabviewIndex){var div;if(!this.tabs[tabviewIndex]){return false}div=this.tabs[tabviewIndex].div;if(!div.className.match(this.REclassTabHide)){div.className+=' '+this.classTabHide}this.navClearActive(tabviewIndex);return this};tabviewObj.prototype.tabShow=function(tabviewIndex){var div;if(!this.tabs[tabviewIndex]){return false}this.tabHideAll();div=this.tabs[tabviewIndex].div;div.className=div.className.replace(this.REclassTabHide,'');this.navSetActive(tabviewIndex);if(typeof this.onTabDisplay=='function'){this.onTabDisplay({'tabview':this,'index':tabviewIndex})}return this};tabviewObj.prototype.navSetActive=function(tabviewIndex){this.tabs[tabviewIndex].li.className=this.classNavActive;return this};tabviewObj.prototype.navClearActive=function(tabviewIndex){this.tabs[tabviewIndex].li.className='';return this};function tabviewAutomatic(tabviewArgs){var tempObj,divs,i;if(!tabviewArgs){tabviewArgs={}}tempObj=new tabviewObj(tabviewArgs);divs=document.getElementsByTagName("div");for(i=0;i<divs.length;i++){if(divs[i].className&&divs[i].className.match(tempObj.REclassMain)){tabviewArgs.div=divs[i];divs[i].tabview=new tabviewObj(tabviewArgs)}}return this}function tabviewAutomaticOnLoad(tabviewArgs){var oldOnLoad;if(!tabviewArgs){tabviewArgs={}}oldOnLoad=window.onload;if(typeof window.onload!='function'){window.onload=function(){tabviewAutomatic(tabviewArgs)}}else{window.onload=function(){oldOnLoad();tabviewAutomatic(tabviewArgs)}}}if(typeof tabviewOptions=='undefined'){tabviewAutomaticOnLoad()}else{if(!tabviewOptions['manualStartup']){tabviewAutomaticOnLoad(tabviewOptions)}}
//]]>
</script>
  • Now Search for <div class='column-right-inner'> or <div id='sidebar-wrapper'> (it will look like the below screenshot)
  • Now Paste The Following Script Just above this Script <div class='column-right-inner'>
<div class='tabview'> 
<b:section class='tabviewtab' id='Tab1' maxwidgets='1'/>
<b:section class='tabviewtab' id='Tab2' maxwidgets='1'/>  
<b:section class='tabviewtab' id='Tab3' maxwidgets='1'/> 
</div>
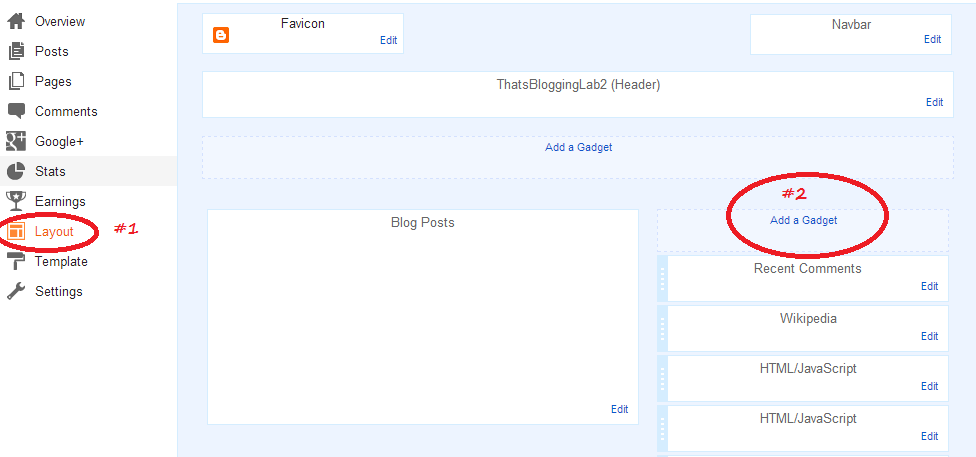
  •  And That's it,Now Go To Layout Section,you will see there 3 New Areas for adding Gadgets.

Changes and Implementation 

If you want to add any Gadget to the list of single Container,just Click On Add a Gadget,and Drag the Gadget to that section.Now if you are interested in adding more Tabs,then follow the below steps.
  • In the Above last one step we have highlighted </div> ,now if you want to add new tab just add the below script before </div> Tag,and that's it.
<b:section class='tabviewtab' id='Tab4' maxwidgets='1'/>


  • Note : If you are adding new tab,then use different ID for each tab,e.g for tab 6 use "Tab6" in the script.
  • Next Important Point is that if your Template sidebar is too short they don't add long and high width Gadget to this Widget.
  • ! important ! : This Widget may slow your Blog Loading Speed, because this widget is lil bit heavy.
  • Note:- If your Blog Sidebars is too short it will not work perfect,either it will just show title or nothing 
So What's Up :- How Was the Widget?You will Like it to Add into your Blog?Share your Beautiful ideas with us.Stay Blessed,Happy Blogging. 

New Expandable Recent Comments Widget For Blogger

Expandable Recent Comments Widget is a new Blogger Widget,which shows the recent comments of the readers along with the Date and Exact Time.This is very interesting widget which allows you to easily see the Contents of the Comment,Now you don't have to Click on the title link or commenter for showing the comments,just add this widget on your blog right side-bar and then you can easily navigate the comments of your readers.For expanding the Content of the comment just click the "plus +"  sign and for hiding the content of comment click the minus sign (-) or you can simply hide and show it by simply pressing Show All or hide All Button at starting time.

How To Add New Expandable Recent Comments Widget To Blogger

  • A Window will Popup Select HTML/JavaScript
  • Now Copy the Below Script and paste it into the Box
<style type="text/css" media="screen">
.row-aa {        background: #f2f2f3; }
.row-bb {        background: #F8F5F1; }
.row-div {
  margin:0px;
  padding:5px;
}
.comment-header {
  font-size:0.9em;
//  border:1px solid #E0E0E0;
//  background-color:#F3F3F3;
  padding:4px;
  margin-top:10px;
  margin-bottom:5px;
}
.comment-box {
  margin:0px;
  padding:0px;
  font-size:0.9em;
  height:500px;
  overflow:auto;
}
.comments1  {
//  background: #F3F3F3;
  padding:3px;
  border-left:1px dashed #A6A6A6;
  color: #888888;
  font-style: italic;
  padding-top:4px;
  margin-bottom:5px;
}
.comment-footer {
  text-align:center;
  font-size:0.9em;
  padding:4px;
  margin-top:5px;
}
</style>
<div style="text-align: center" class="comment-header"><input class="comment-button" id="commshowall" type="button" onclick="if (this.value == &#39;Show all&#39;) { unfold_all(this); this.value=&#39;Hide all&#39;; } else { fold_all(this); this.value=&#39;Show all&#39;; }" style="width:8em;font-size:1em;font-family:Verdana,sans" value="Show all" /></div>
<div class="comment-box">
<script type="text/javascript" src="http://helplogger.googlecode.com/svn/trunk/expandable-recent-comments.js"></script>
<script type="text/javascript"  src="http://thatsblogging.blogspot.com/feeds/posts/default?start-index=1&max-results=999999&alt=json-in-script&callback=showrecentposts">
</script>
<script type="text/javascript"  src="http://thatsblogging.blogspot.com/feeds/comments/default?start-index=1&max-results=999999&alt=json-in-script&callback=showrecentcomments">
</script>
</div>

  • Replace  "http://thatsblogging.blogspot.com" with your Own Blog URL 
  • Save The Widget and that's it
So What's Up:- This was really awesome widget,we already shared many Recent Comments Widgets but this one is really attractive and accessible widget,try it and share your beautiful ideas with us,stay Blessed,Happy Blogging.Script/Code Credit @Helplogger


Add Social Sharing Buttons Widget To Blogger

Add Social Sharing Buttons Widget To Blogger
Social Media has become the main source of your Blog/website traffic,there fore never underestimate the social media networks.For Boosting Blog traffic you should add Social Sharing Buttons Widget to your Blog.Which helps you and your visitors to easily share your Blog Contents with their Friends,as a result you will get the bonus of traffic to your blog.The widget we are sharing contain Google+ Share Button,Twitter Tweet Buttons,Stumble,Facebook Send and Like Button,Pinterest,and many other social network buttons.You can add it either above the Blogger Post or Below the Blogger Posts,however it is very simple and clean widget which will not effect your Blog Loading Speed.

How To Add Social Sharing Buttons Widget To Blogger

  • Go To Blogger Dashboard
  • There Click On Template 
  • Now Search for This Script/Code <data:post.body/>
  • After Finding The above Code in Template
  • Copy The Below Script and paste it above(for Showing Buttons above The Blogger Post) or below(for Showing Buttons Below Blogger Post) this Script <data:post.body/>
  <b:if cond='data:blog.pageType == &quot;item&quot;'>   <div class="sharethatsblogging"> <center><div class="headingthatsblogging">Like the Post? Do share with your Friends.</div>     <ul class='social' id='cssanimation'>     <li class='facebook'>     <a expr:href='&quot;http://www.facebook.com/share.php?v=4&amp;src=bm&amp;u=&quot; + data:post.url + &quot;&amp;t=&quot; + data:post.title ' onclick='window.open(this.href,&apos;sharer&apos;,&apos;toolbar=0,status=0,width=626,height=436&apos;); return false;' rel='nofollow'><strong>Facebook</strong></a>     </li>     <li class='twitter'>     <a expr:href='&quot;http://twitter.com/home?status=&quot; + data:post.title + &quot; -- &quot; + data:post.url ' rel='nofollow' target='_blank'><strong>Twitter</strong></a>     </li>     <li class='googleplus'> <a expr:href='&quot;https://plusone.google.com/_/+1/confirm?hl=en&amp;url=&quot; + data:post.url' onclick='window.open(this.href,&apos;sharer&apos;,&apos;toolbar=0,status=0,width=626,height=436&apos;); return false;' rel='nofollow' target='_blank'><strong>Google+</strong></a>     </li>     <li class='pinterest'> <a href='javascript:void((function()%7Bvar%20e=document.createElement(&apos;script&apos;);e.setAttribute(&apos;type&apos;,&apos;text/javascript&apos;);e.setAttribute(&apos;charset&apos;,&apos;UTF-8&apos;);e.setAttribute(&apos;src&apos;,&apos;http://assets.pinterest.com/js/pinmarklet.js?r=&apos;+Math.random()*99999999);document.body.appendChild(e)%7D)());' rel='nofollow' target='_blank'><strong>Pinterest</strong></a>     </li>     <li class='stumbleupon'>     <a expr:href='&quot;http://www.stumbleupon.com/submit?url=&quot; + data:post.url + &quot;&amp;title=&quot; + data:post.title ' rel='nofollow' target='_blank'><strong>StumbleUpon</strong></a>     </li>     <li class='delicious'>     <a expr:href='&quot;http://delicious.com/post?url=&quot; + data:post.url + &quot;&amp;title=&quot; + data:post.title ' rel='nofollow' target='_blank'><strong>Delicious</strong></a>     </li>     <li class='linkedin'>     <a expr:href='&quot;http://www.linkedin.com/shareArticle?mini=true&amp;url=&quot; + data:post.url + &quot;&amp;title=&quot; + data:post.title + &quot;&amp;summary=&amp;source=&quot;' rel='nofollow' target='_blank'><strong>LinkedIn</strong></a>     </li>     <li class='reddit'>     <a expr:href='&quot;http://reddit.com/submit?url=&quot; + data:post.url + &quot;&amp;title=&quot; + data:post.title ' rel='nofollow'><strong>Reddit</strong></a>     </li>     <li class='technorati'>     <a expr:href='&quot;http://technorati.com/faves?add=&quot; + data:post.url ' rel='nofollow' target='_blank'><strong>Technorati</strong></a>     </li>     </ul></center></div>   <link href='http://fonts.googleapis.com/css?family=Englebert' rel='stylesheet' type='text/css'/>​ <style> ul.social { list-style:none; display:inline-block; margin:15px auto; }  ul.social li { display:inline; float:left; background-repeat:no-repeat; }  ul.social li a { display:block; width:50px; height:50px; padding-right:10px; position:relative; text-decoration:none; }  ul.social li a strong { font-weight:400; position:absolute; left:20px; top:-1px; color:#fff; z-index:9999; text-shadow:1px 1px 0 rgba(0,0,0,0.75); background-color:rgba(0,0,0,0.7); -moz-border-radius:3px; -moz-box-shadow:0 0 5px rgba(0,0,0,0.5); -webkit-border-radius:3px; -webkit-box-shadow:0 0 5px rgba(0,0,0,0.5); border-radius:3px; box-shadow:0 0 5px rgba(0,0,0,0.5); padding:3px; }  ul.social li.facebook { background-image:url(https://blogger.googleusercontent.com/img/b/R29vZ2xl/AVvXsEh56LKrHhNlPMseFYai96cfJ3CCCqgBD2WSQqh-oeHw0sQQ_g9ydl_XaATghXVCQYsrWKv3xtkuLDc0I8amrSAt6lXjQ8Okw9Jcq0-AanHz-sNQwVlej_oZERSUsFsJRaSFt-8Zuw5A7OU/s50/facebook.png); }  ul.social li.twitter { background-image:url(https://blogger.googleusercontent.com/img/b/R29vZ2xl/AVvXsEg6rtYtX2p2taTAUhujbQwmCxCCF4yYa7ZrWvPvcfIi-lUEzVC9aMIHPG6ybUfVlbNuzvcwQDZ-LU_nZfbjHOZY2ZRSJAEeVKDaya4zS1e2IU0WV-W93FB1mmLgLZUbrnAx-szy4ywQsU8/s50/twitter.png); }  ul.social li.googleplus { background-image:url(https://blogger.googleusercontent.com/img/b/R29vZ2xl/AVvXsEj2-hdX3WDXv-A0mHd3Bst8Cx2RbQKqOpzZ4RFDuh-KZGpWioNUyDdU6EASRbQdXRTU341ERuBU9hz5ZHTOV9wL8Ft0Iw1nCu9f_gmLsCaGBmxG-3wmAa5FnaeAwAduetMT7Gq6OtA3b1E/s50/google%252B.png); }  ul li.pinterest { background-image: url(https://blogger.googleusercontent.com/img/b/R29vZ2xl/AVvXsEhRfIVVIVz_BRUxTcHcONX7j4vNvOVZ1PNd3bro1X9lmSZubCC5XCPHRAUNyNvfWN2NXyeTuh7hyHTZsYJN1VuNOsaSXkuSzLyKFjhnW0Akrasln9PRqk4ZZoixwIEn4Jw96yBnUsb4oyY/s50/pinterest.png); }  ul.social li.stumbleupon { background-image:url(https://blogger.googleusercontent.com/img/b/R29vZ2xl/AVvXsEhNsHThIvFwxsvQ3tJyi3c4TBHVgxhEl0O_povEo7xZGL6HwREDX1O0Y8Uu1bkyv6lot7MSAB35g7Mdt4Mgovi9oZTRVSKFN4MfCKPQHaMY2IiyepDntiu56e2tUeR3-ohwGfu-L3jjvG4/s50/stumbleupon.png); }  ul.social li.delicious { background-image:url(https://blogger.googleusercontent.com/img/b/R29vZ2xl/AVvXsEhYiwvdVzCZS8Toe_Wha4QQ8q-eylXg0IpCGd0pbra-PmcUXK0LsVvXOHhBgRSCQN8vaF9RhyV9sXmLu3UrDR5WEMKvrYyL9YLYG9zhyhlJz8V6746VA9_q_LmrA-PP2dCz2ikd6WTNXWg/s50/delicious.png); }  ul.social li.linkedin { background-image:url(https://blogger.googleusercontent.com/img/b/R29vZ2xl/AVvXsEgNtX-7UzKnISbIPGUl4cMG7ZcbDe5v9FTmQdDFzg_l9DWuj7D1MoiSBhC5Cn5bD7YqsTpSkM45NiusVK-Uo9Nb93A2Gf4Bnh1xUf_rvfn6ybyaJ2tsqqwfvAeufBkoXVX5pnrwUbme1zc/s50/linkedin.png); }  ul.social li.reddit { background-image:url(https://blogger.googleusercontent.com/img/b/R29vZ2xl/AVvXsEjp9FkWXqg_xtjKcmTlpK30PXTFhsQxXHI4e4dU3KKGyJBPTYgBFsQYZRwqx44XqQnEB1hduvL5H9Dwtv6fAt14gPD1AR606ipXqg4tVGH7D2O8RHUHw4pG06q_0snf_jEVGg6dODPQJ6M/s50/reddit.png); }  ul.social li.technorati { background-image:url(https://blogger.googleusercontent.com/img/b/R29vZ2xl/AVvXsEiDOnHBohbwt3NxxnB6NWoabIrRXLU65Q5X5F9JH93IKQyoGBjcRi48JbCKuTJzhINx4g4mUAhl4XWCBpZWhYxdVzIBTxZqF2LmnVBCGqSZXVTUx2tbqJEVHLqSqhREvL9FMsfS1udSHn3E/s1600/TBI-technorati.png); }  #cssanimation:hover li { opacity:0.2; }  #cssanimation li { -webkit-transition-property:opacity; -webkit-transition-duration:500ms; -moz-transition-property:opacity; -moz-transition-duration:500ms; }  #cssanimation li a strong { opacity:0; -webkit-transition-property:opacity, top; -webkit-transition-duration:300ms; -moz-transition-property:opacity, top; -moz-transition-duration:300ms; }  #cssanimation li:hover { opacity:1; }  #cssanimation li:hover a strong { opacity:1; top:-10px; } .headinglordhtml{     font-size:25px;     font-family: 'Englebert', sans-serif; } .sharelordhtml{   border-top:30px solid #3873CC;      padding:16px;         -webkit-box-shadow: 0px 7px 9px rgba(50, 50, 50, 0.75); -moz-box-shadow:    0px 7px 9px rgba(50, 50, 50, 0.75); box-shadow:         0px 7px 9px rgba(50, 50, 50, 0.75);     transition: background .777s; -webkit-transition: background .777s; -moz-transition:background .777s; -o-transition: background .777s; -ms-transition: background .777s;     background:#D9D6FF; }  .sharelordhtml:hover {         background:white;  }  ​ </style>  </b:if>
Note:-
- In Magazine Blogger Templates,there are more then two Scripts similar to <data:post.body/>,so do paste the above Script after each script.
  • Now when you paste the above script after <data:post.body/> ,take a Preview and Then Hit save Template.
  • That's it,now take a look on your blog post social sharing widget will dancing there :)

So What's UP

Actually this widget is the main source of many blogger to get a flood of traffic,however this widget is very easy to navigate,so it will help your readers to share your blog contents with their friends.Share your beautiful ideas with us,stay Blessed Happy Blogging :)

Add jQuery Pop-up Facebook Like Box with Timer To Blogger

Time To Boost Your Facebook Fan Page Likes,Now its very easy to socially force your visitors to like your Facebook Fan Page.Actually this widget has a unique feature i.e it loads very fast, New jQuery Popup Facebook Like Box along with timer is a new Blogger Widget which can help you to increase your Fan page Likes.The most beautiful thing in this widget is that you can customize it Accordingly i.e you can change the time interval of Closing or You Can also change the Text "Like us On FB" and even the text "cancel".Once You added this Widget to Blogger,it will popup when someone land to your Blog and it will Provide a cool look to the reader/visitor of Blog to socially force him for liking your Fan Page ;) 

How To Add jQuery Pop-up Facebook Like Box with Timer To Blogger

Before adding this Widget you need to install the jQuery Plugin,if jQuery Plugin is already installed on your Blog,then No worry just follow the below steps and install the widget,but if not,then Go To Blogger Dashboard >> Click On Template >> and Search for </Head> tag , now copy the below script and paste it above </head> tag.
<script type="text/javascript" src="http://ajax.googleapis.com/ajax/libs/jquery/1.8.2/jquery.js"></script>

  • After Installing the jQuery Plugin To Your Blog Follow the below steps
  • Go To Blogger Dashboard
  • Click On Layout
  • Now Click On Add a Gadget
  • Now a Box will Popup
  • Select HTML/JavaScript There
  • Now another Box will popup
  • Now Copy the below Script and make the specific changes and paste it into the HTML/JavaScript Box
<style type='text/css'>
#makingdifferentpopup{
position: fixed;
top:100px;
z-index:9999;
display:none;
padding:0px;
right:600px;
border:10px solid rgba(82, 82, 82, 0.7);
-webkit-background-clip: padding-box; /* for Safari */
background-clip: padding-box; /* for IE9+, Firefox 4+, Opera, Chrome */
-webkit-border-radius:8px 8px 8px 8px;
-moz-border-radius:8px 8px 8px 8px;
border-radius:8px 8px 8px 8px;
width:400px;
height:360px;
overflow:hidden;
}
#makingdifferentpopup span{
font-size:20px !important;
font-weight:bold !important;
}
#makingdifferentpopup h1{
background:#6d84b4 url(https://blogger.googleusercontent.com/img/b/R29vZ2xl/AVvXsEgJwIzxWzsElO3lyxlVhxdRFDKx62TEEKx8J_zEia69NrAQS0-4YEnzrsRLcZE1WlhWuhAc58pXQiUtPFmL1IkXYIwhPXCk7rdFF-mOPHQYP-aGyrQBAELajbqL6Fcn3MJ9oKn3Ham-1Nex/s1600/%255Bwww.gj37765.blogspot.com%255Dh1.png) 98% no-repeat;
border:1px solid #3b5998 !important;
color:#FFFFFF !important;
font-size:20px !important;
font-weight:700 !important;
padding:5px !important;
margin:0 !important;
font-family:'"lucida grande",tahoma,verdana,arial,sans-serif !important;
overflow:hidden !important;
}
.htmlarea{
font-size:12px !important;
font-weight:normal !important;
height:265px !important;
padding:1px !important;
background:#fff !important;
border-bottom:2px solid #ddd;
overflow:hidden !important;
}
#mdfooter{
text-align:left;
background:#F2F2F2 !important;
height:56px !important;
padding:10px 10px 10px 10px !important;
overflow:hidden !important;
}
#mdclose{
float:right;
background-color:#eee !important;
border:1px solid #ccc !important;
color:#111 !important;
font-weight:bold !important;
padding:5px 8px 5px 8px !important;
text-decoration:none !important;
display:inline-block !important;
font-family:'"lucida grande",tahoma,verdana,arial,sans-serif !important;
outline:none !important;
position:relative !important;
font-size:18px !important;
margin:1px !important;
}
#mdclose:active{
top:1px;
left:1px;
}
.grabthis{
bottom:80px;
font:8px "lucida grande",tahoma,verdana,arial,sans-serif;
position:absolute;
right:6px;
text-align:right;
z-index: 99999;
}
.grabthis a{
color: #000;
text-decoration:none;
}
.grabthis a:hover{
text-decoration:underline;
}
</style>
<script type='text/javascript'>
jQuery(document).ready(function() {
function makingdifferent_ppopup()  {
var sec = 10
var timer = setInterval(function() {
   $("#mdfooter span").text(sec--);
   if (sec == 0) {
      $("#makingdifferentpopup").fadeOut("slow");
      clearInterval(timer);
   }
},1000);
  var mdwh = jQuery(window).height();
  var mdpph = jQuery("#makingdifferentpopup").height();
  var mdfromTop = jQuery(window).scrollTop()+50;
 jQuery("#makingdifferentpopup").css({"top":mdfromTop});}
jQuery(window).fadeIn(makingdifferent_ppopup).resize(makingdifferent_ppopup)
 //alert(jQuery.cookie('sreqshown'));
 //var mdww = jQuery(window).width();
 //var mdppw = jQuery("#makingdifferentpopup").width();
 //var mdleftm = (mdww-mdppw)/2;
   var mdleftm = 500;
 //var mdwh = jQuery(window).height();
 //var mdpph = jQuery("#makingdifferentpopup").height();
 //var mdfromTop = (jQuery(window).scrollTop()+mdwh-mdpph) / 2;
 jQuery("#makingdifferentpopup").animate({opacity: "1", left: "0" , left:  mdleftm}, 0).show();
     jQuery("#mdclose").click(function() {
jQuery("#makingdifferentpopup").animate({opacity: "0", left: "-5000000"}, 1000).show();});});
</script>
<div id="makingdifferentpopup">
<h1>Join us on Facebook</h1>
<div class="htmlarea">
<iframe src="//www.facebook.com/plugins/likebox.php?href=https%3A%2F%2Fwww.facebook.com%2Fthatsblogging&amp;width=400&amp;colorscheme=light&amp;show_faces=true&amp;border_color=%23fff&amp;stream=false&amp;header=false&amp;height=250" scrolling="no" frameborder="0" style="border:none; overflow:hidden; width:400px; height:250px;" allowtransparency="true"></iframe>
<div class="grabthis">
By <a href="http://thatsblogging.blogspot.com/" target="_blank">ThatsBlogging</a> / <a href="http://thatsblogging.blogspot.com/" target="_blank">+Get This!</a>
</div>
</div>
<div id="mdfooter">
Please wait..<span>10</span> Seconds
<a href="#" id="mdclose" onclick="return false;">Cancel</a>
</div>
</div>
<!-- End popup -->

Changes in The Script before installing

  • Replace thatsblogging in the script with your Own Facebook Fan page username.
  • For changing the Time Interval,Change var sec = 10 with your Own Desire time.
  • If you are interested in changing the height and width of the Box Change 250 and 400 in the Script
  • For Changing The Text "Join us on Facebook" just change the text with your Own.
  • Change The Text "Cancel" with your Desire text
  • Now Copy the Script and paste it into the box 
  • Now hit Save and that's it 
  • Script Credit Purely Goes To "MakingDifferent"
So What's Up :- Adding this jQuery Popup will force your Readers to like your Fan page and as a result you can increase your Fan page Likes,Share your Beautiful Ideas with us,and if you have any Question ask us,stay Blessed ,Happy Blogging.
Add jQuery Pop-up Facebook Like Box with Timer To Blogger
Last Reviewed by Iftikhar uddinon June 24 2013
Rating: 5

Top 5 Cool WordPress Plugins 2013

WordPress is a free Blogging Tool,WordPress is providing a huge amount of Plugins for their users,and it is extremely popular due to the availability of numerous plugins.Actually WordPress Provides alot of Plugins which can help you in increasing your Blog SEO(Search Engine Optimization),security,and other related functionality of WordPress Blogs.As in Blogger blogs the loading speed of blog get down by adding extra JavaScript widgets,likewise in WordPress installing many or extra Plugins to WordPress Blogs may down your Blog Loading Speed,and as a result you may lose your Blog Traffic.So be careful while installing any Plugin.However the Plugin we are going to Provide is simple and easy to install,these plugins will not effect your Blog Speed.
image source highervisibility

Top 5 Cool WordPress Plugins 2013

If you are using WordPress and you don't have any one of the below Plugins installed,then you are forsaken by fortune,however these plugins are really awesome,you must install it in your WordPress Blog.The list of the Cool WordPress Plugins are Given below.

WP-Biographia Plugin For WordPress

Time to show your Biography to the audience of your Blog,this widget helps the Blogger to show his/her Information and Bio Data to the Visitors of Blog.Installing  Wp-Biographia will helps you to add a stylish and awesome author Bio box to every post and page of the blog.For installing this widget to your Blog Click the below green button.


Comment Notifier Plugin for WordPress

Whenever One leaves comment on your Blog Content,this Comment Notifier Plugin will Welcome him/her by sending a welcome Email.This is the best way to increase your Blog Traffic in a decent way.This Plugin Provides alot of option for customizing,you can customize it accordingly.You can set any text in welcoming your New Blog Commentor,Once you set the text then the Comment Notifier Plugin is responsible for sending the welcome email.

Captcha,Another WordPress Plugin

This Plugin is used when you have enabled the registration of users on your blog.The Question is Why when the registration is Enable?Because it installs modern Bots registers on your blog which automatically verify the email.For preventing the Spam registration,you surely need to install this Plugin in your Blog.So if you want to avoid spamming and if you are bore of spamming then must install this plugin on your Blog.

Broken Link Checker Plugin For WordPress

To err is human,some time we place a broken link mistakenly or something happens to the server of the link.These Broken links effect the SEO negatively and also this will made the readers unhappy.So if you want to avoid this issue,you must install this Plugin.Broken Link Checker Plugin Scan for Broken Links and where broken link is found it directly informs you.Then you can easily navigate the link and can modify it .

Exclude Pages Plugin for WordPress

Sometime due to personal issues or due to any solid reason we want to hide some pages from the navigation menu.Exclude Pages Plugin will helps you to hide any page you want.Actually this Plugin puts a check box in the sidebar of post section,now it provides you two options either you want to show the page in navigation menu or not,if yes it can be done just by single Click.

So What's Up:- These were Top 5 Cool WordPress Plugins 2013,now share your beautiful ideas with us about these Plugins.Tell us which One you Like the most?How was the article?WordPress is Best or Blogging? Do You Like Blogger Widgets or WordPress Plugins? Stay Blessed,Happy Blogging.
Top 5 Cool WordPress Plugins 2013
Last Reviewed by Iftikhar uddinon June 24 2013
Rating: 5

Add Total Posts and Comments Widget To Blogger


Its not very impressive for Pro Bloggers,but some bloggers love to show Total Posts and Comments Total Number in Blogger.Actually this widget will Show the Total No Of Comments on your Blog Articles,it fetch the total comments and Total No of Posts in your Blog.This widget is very easy to add,you can put it any where in your Blog.But the most appropriate place for adding this widget is Header or Sidebar,all you have to do is adding a Small JavaScript Code into the Layout Section.


How To Add Total Posts and Comments Widget To Blogger

  • Go To Blogger Dashboard
  • Now Click On Layout
  • Then Click On Add a Gadget
  • A Small Box will Popup,Select HTML/JavaScript
  • And Now Copy the Below Script and Paste it over there


<script style="text/javascript">function mbhTotalCount(json) {document.write(parseInt(json.feed.openSearch$totalResults.$t,10));}</script><p style="font:13px Tahoma;">Total Posts: <script src="http://thatsblogging.blogspot.com/feeds/posts/default?alt=json-in-script&callback=mbhTotalCount"></script></p><p style="font:13px Tahoma;">Total Comments: <script src="http://thatsblogging.blogspot.com/feeds/comments/default?alt=json-in-script&callback=mbhTotalCount"></script></p>

Changes in the Widget Script

  • Replace "ThatsBlogging.Blogspot.com" with your Own Blog URL
  • If you are interested in Changing the Text of "Total Posts" or "Total Comments",Simply Change the Green with your Own Text.
  • You Can Also Change the Font Size and Style in the Script.
  • After changing Copy the Above Script and paste it in HTML/JavaScript Box and hit save.
  • That's it :)
So What's Up :- This is a common widget which is usually used for showing the total number of Posts and Comments on Blog.Share your Beautiful ideas with us,stay Blessed,Happy Blogging.

Top 5 Awesome Google AdSense Alternatives

Internet World is Young,and Providing alot of opportunities to earn a huge amount of Money.This is 100% true that Google Adsense is ruling the world and their is no competitor to Google Adsense which helps you to earn a huge amount of revenue from your Blog/Website.Actually now-a-days many bloggers have lost their Adsense Accounts due to invalid Click Activity or any Solid Reason which is against AdSense Policies.However there are many PPC Programs which is dancing in the Internet World but the problem with them is;they pay very low amount of money.In this regard  we will provide you some Alternatives of Google Adsense which can pay a huge amount of money to you and you can easily monetize for these Products.
top-5


Top 5 Awesome Google AdSense Alternatives 

As we mentioned above that Google AdSense is ruling the world and paying a flood of money to their publishers so their is no competitor to Google Adsense,however we are providing some Alternatives which will surely help you to generate a good amount of money from your Blog/websites.All these Products will pay you a good amount of money but they have certain conditions which should be present in your Blog/website and i.e your Blog should have a good amount of Organic Traffic,PR should be high,and Alexa should be high.In short you can go for any of the below products,and i hope you will earn alot of money from these Products.

AdBrite,The Best AdSense Alternative

AdBrite

AdBrite–AdBrite is one of the most popular source of monetizing your Blog.It pay a good amount of money,however it doesn't show any ads on your Blog/Website,AdBrite Provides Text Link Ads,Picture ads and inline ads.For Monetizing with AdBrite you have to signup there as a Publisher,then create or setup "ad zone" in the Ad zone you will have to Provide your Blog/Website URL and description. AdBrite allows you to enter 50 keywords related to your website/blog.Actually these keywords will helps the AdBrite Network to navigate and match right advertisers to your blog/website.

Yahoo (Media.net),The Awesome Source of Monetizing.


image source theseoportal.com
Yahoo(Media.Net)–The most amazing and interesting fact about Yahoo Contextual ads is that it get approve very quickly.It doesn't depends on the site traffic but quality.The minimum payment is 100$,in this case it is similar to Google AdSense but in Yahoo you don't have to wait for PIN, because it pays on Paypal.Media.net has been started in 2013 and has got alot of popularity,so there is something,don't waste your time if you don't have Adsense Account go for Media.net.

BuySellAds,Proudly Competing With Adsense

image source geteverything.com
BuySellAds–BuySellAds was started in February 2008 and now this Product is in clouds,they get alot of success in a short interval of time.This Product is lil bit proud,and wants something big from their Publishers,but as a result they pay a huge amount of Money,they don't approve a blog/site which has less then 50K visitors daily.It also adds some other condition i.e Your Blog Should have high PR at-least 1 or higher.However it pays a good amount of money.The minimum Payout at BuySellAds is 50$(DOLLERS) which a publisher can get via Paypal easily.

Tribal Fusion,The Another Source for Monetizing Blogs or websites

Tribal Fusion–Tribal Fusion is another awesome alternative to Google Adsense which pay a good amount of money to their publishers.Tribal Fusion is more strict than BuySellAds,likewise it also needs a flood of traffic,Page Rank and Alexa Rank of a Website/Blog.Once you got approve you will get a high CPM.The minimum Payout at Tribal Fusion is 100$,the money can be transferred via Bank Account or directly through a Check.So go for tribal fusion if you don't have AdSense Account and try it 

Chitka,The Recommended AdSense Alternative.

chitika
image source technobuffalo.com
Chitka–Chitka is one of the most Popular Alternative AdSense,it is liked by many Bloggers,the secret about this Love is that they pay per Click and you can cash out once your Earning reaches 10$.The payment can be received by Paypal. Chitka Always show the targeted ads,in short chitka is a fantastic Advertising Network for making money Online.So don't waste time if you don't have Adsense Account,Go for Chitka and Enjoy Earning.

So What's Up :- You can observe from my Blog,i am using Adsense and earning alot of money,whats your opinion,also share with us what you use?What you Prefer to use?Which One is the Best Advertising Network?Is Google Adsense the best One?Did You Like the Post?Share your Beautiful ideas with us,stay Blessed,Happy Blogging :)


Google Adsense PIN - What To Do if Adsense Pin Not Received


One of the most awful problem in Google Adsense is reaching of Pin from Google Adsense Team.Actually Google send its Publishers a Personal Identification Number (PIN) which is enclosed in a small white envelop for the verification of his/her Postal Address.Google sends this Code (PIN) when you earning threshold reaches 10$ (Dollers),they inform you when they issue this PIN.Now the problem is how we can receive this PIN?Many Question Comes and we have faced it too many times?How much Time it takes to reach Adsense PIN? I am not receiving my Adsense PIN?My PIN has been issued but i haven't received it?All the Problems comes up with The Country i.e from where you are ? Are You Pakistani ? Are you Indian ? or any Asian Country?I don't know exact why Google Adsense hates these Countries? In Pakistan Our postal service is very poor,therefore one can't receives his/her PIN in time.Actually Google Adsense Team ensure you that you will receive your Adsense PIN in just 2-3 Weeks or Less then 2-3 days,it depends upon the postal service Of your Country.According to my Experience you can receive the Google Adsense Pin but if you provide the data in correct manner,this is what i did wrong 2 times and i haven't received my  Adsense PIN and atlast when i correct the Contact Details,within 15 days i received my Adsense Pin from Google Adsense Team.The sequence of Details was as under.


  • House No,Room No or any Organization,Office and School
  • Street Address (Clear and well known place)
  • Postal Code/Zip of Your Area (i.e Postal Code of Peshawar is 25000)
  • City Name
  • And Country 
Now if you have followed the above steps correctly,i can guarantee within 2 weeks you will receive your Adsense PIN.

Why Google Adsense Team Send PIN?

The aim of sending the Adsense PIN to Publishers is to ensure the publisher that he/she is really the resident of a specific country which One has enter in One's Google Adsense Account.And the 2nd most important aim is that to ensure the Publisher receives his/her Cheque of earnings which is sent by Standered mail.

What If i didn't Enter my Adsense PIN


Actually when you got the Google Adsense PIN,then Google Adsense Team allow you to enter the PIN Code which is 6 numbers code within 6 months and if you not enter your PIN within 6 months,Google Adsense Team will stop showing ads on your Blog/Website,now to get rid of this problem enter the PIN and by entering PIN the Payment Hold will be removed.Remember,don't enter the PIN wrongly i.e if you type your Code 3 times wrongly your Google Adsense Account will be disabled/suspended and then you will weep for a week :D,so always be attentive don't try to become a lazy bum :)

Adsense Pin still Not Received What to DO?

Now if you still haven't received the Adsense then follow the below steps to Remove Payment On Hold from Adsense Account.
  • Go To Your Adsense Account
  • Click On Payment Option
  • Now You will see an Option at that Page i.e Request for new PIN Code,Just Click On That and request for new One
  • Now wait for 3 weeks,and again request for the PIN.
  • Now time to get rid of " On Hold ",this time after 3 weeks i.e 21 days you will see another option at that page which will lead you to another page/forum which can easily help you to request the Adsense Team to verify your Address Manually.
  • Click On that Link,it will redirect you to a form where you have to enter your Publisher ID,name and other information.
  • But the most important they will ask you about to provide a Scanned Copy of your Government Issued Card or ID Card which contain the details of your residence.You must provide an ID in which the detail about the Adreess matches with the Adsense Contact Address.
  • Now when you upload the ID
  • Google Team will email you in 5 minutes and will inform you that "Congratulations ! You will never have to enter the PIN in future,Adsense Account Payment Hold is removed Regards Adsense Team."
  • And that's it :)
So What's Up:- How was the Trick?Is not it easy?This is the best way to receive Adsense PIN from Adsense Team,Once they removed the On Hold from your Account,then enjoy you will never have to enter the PIN in future.

How To Add Google+ Comments Widget To Blogger

Blogger has recently introduced Google+ Comments for Blogs.As Facebook had released Facebook Comment Box for Bloggers,contrary Google+ has also introduced new comments widget i.e Google+ Comment Widget For Blogger.Actually Comments helps you to inspire the new entries of your blog.As far Comment is Consider we can called it half meeting with your Blog readers.However Google has just made few improvement for Bloggers i.e now you can simply add your Google+ Comment widget to Blogger.And the most amazing thing is that we can enable this widget from Our Blog Dashboard,Once it is enabled then enjoy different comments from users.


Features Of Google+ Comments Widget

  • As the Author of the Blog or Admin of the Blog you will receive visitors Comments
  • Comments can be done by those who has Google+ Profile or Page
  • It is very easy to navigate and friendly Comment widget
  • When someone comments on the shared link(i.e from Google+) this widget will fetch that Data(comments) and will show it in Blogger Comments Area.

How To Add Google Plus Comments Widget To Blogger

  • Go To Blogger.com
  • Sign in to your Blogger Account
  • Now Click On Google+ (at the right side) 
  • Now a Another page will appear,there select "use Google+ Comments on this Blog",it will be as shown in the below screen shot 

  • And that's it
  • Enjoy Google+ Comment Widget in Your Blog
Note:-
It will show this Option in those Blogs which Email Address is attached to the specific blog.In simple words it will work with the blog which you own and you have to full access of your blog and email address.

How To Remove Google+ Comments Widget To Blogger

Actually i applied this Comment widget,but it is not as interesting as the blogger old One Comments Default widget.So i removed it,Now how to remove this its very simple follow the below steps.
  • Go To Blogger Dashboard
  • Now Click On Google+ at the right side
  • Now Unchecked "use Google+ Comments on this Blog",it will looks like as shown in the below screen shot 

So What's Up:- Did You Like the New Widget ? How was the Article ? Feel free to ask any question,Stay Blessed,Happy Blogging :)


How To Add Related Posts Widget With Thumbnails To Blogger

Time to boost your blog page-views,here is incredible hack via which you can show the related posts to blog article below every Blog post,along with beautiful thumbnails.The data for related posts are fetched from Blog Labels and different posts.Applying this hack will help you to host your visitors with great luxury,as a result he will remain long time on your blog seeing different interesting related articles. 
related-posts-widget-for-blogger

How To Add Related Posts Widget With Thumbnails To Blogger


  • Go To Blogger Dashboard
  • Click On template and Then Click On edit HTML
  • Now Search for </head> Tag
  • Now Copy the below script and paste it above </head> Tag
<!--Related Posts with thumbnails Scripts and Styles Start--> <!-- remove --><b:if cond='data:blog.pageType == &quot;item&quot;'> <style type='text/css'> #related-posts { float:center; text-transform:none; height:100%; min-height:100%; padding-top:5px; padding-left:5px; } #related-posts h2{ font-size: 18px; letter-spacing: 2px; font-weight: bold; text-transform: none; color: #5D5D5D; font-family: Arial Narrow; margin-bottom: 0.75em; margin-top: 0em; padding-top: 0em; } #related-posts a{ border-right: 1px dotted #DDDDDD; color:#5D5D5D; } #related-posts a:hover{ color:black; background-color:#EDEDEF; } </style> <script type='text/javascript'> var defaultnoimage=&quot;https://blogger.googleusercontent.com/img/b/R29vZ2xl/AVvXsEgo9MQaBrjQZI8mNC9Dgfmhf434zcJWkDL9Go8AlPcowuQCW_NONqJjYJX2-V9fQ2mHUmZjTiDfa5U2rPSA18R-d-DqMrmLYqJbOAfcR0-HJWKi9zwtzEduYt9z_K8MuEvpLL6c1VCsMIP0/s1600/no_image.jpg&quot;; var maxresults=4; var splittercolor=&quot;#DDDDDD&quot;; var relatedpoststitle=&quot;Related Posts&quot;; </script> <script src='http://helplogger.googlecode.com/svn/trunk/related-posts-with-big-thumbnails.js' type='text/javascript'/> <!-- remove --></b:if> <!--Related Posts with thumbnails Scripts and Styles End-->
Note :-
- If you want to change the Default Picture to your own or any other picture,then simply replace the Green URL With your Own image URL.
-For Displaying more than 4 posts in the widget then change the value of 4 in the script to desired no of posts.
-If you want to display this widget also in Home Page then remove the Blue script from the above script

  • Now Search for The below Script (Note The Below mentioned Code is 2 times in magazine style Blogger Templates so do paste the below Code after each.)
<div class='post-footer'>

  • Now Copy the below script and paste it  above <div class='post-footer'>
<!-- Related Posts with Thumbnails Code Start--> <!-- remove --><b:if cond='data:blog.pageType == &quot;item&quot;'> <div id='related-posts'> <b:loop values='data:post.labels' var='label'> <b:if cond='data:label.isLast != &quot;true&quot;'> </b:if> <script expr:src='&quot;/feeds/posts/default/-/&quot; + data:label.name + &quot;?alt=json-in-script&amp;callback=related_results_labels_thumbs&amp;max-results=4&quot;' type='text/javascript'/></b:loop> <script type='text/javascript'> removeRelatedDuplicates_thumbs(); printRelatedLabels_thumbs(&quot;<data:post.url/>&quot;); </script> </div><div style='clear:both'/> <!-- remove --></b:if> <b:if cond='data:blog.url == data:blog.homepageUrl'><b:if cond='data:post.isFirstPost'> <a href='http://thatsblogging.blogspot.com'><img alt='Blogger Tricks' src='https://blogger.googleusercontent.com/img/b/R29vZ2xl/AVvXsEigk-P-aP2fXW2ESqyAYQxxj-4VbxigMctNWKPAsN_Nl5Wyb3_WrH7alDIf5g3BiapOA3Jv4p7Fp3Gu2WvuIMhR0ccQQIkzUh7qqA7ThabkMJHOcaAmlITNV7hTpyuIHB6_8FzN5lool7vd/s1600/best+blogger+tips.png'/></a> </b:if></b:if> <!-- Related Posts with Thumbnails Code End-->
Note:-
-For Displaying more than 4 posts in the widget then change the value of 4 in the script to desired no of posts.
-If you want to display this widget also in Home Page then remove the Blue script from the above script.

  • Now just hit save template and that's it

So What's Up

Adding Related Posts Widget With Thumbnails To Blogger will help you to boost your Blog page-views,actually this post is originally written by HelpLogger,So Script Credit Goes to HelpLogger.If you have any question related this article,must pass comments.Stay Blessed,Happy Blogging.